
Introduction
Managing purchase requests of goods or services is an important part of procurement. Quick and efficient approval and processing of the requests is the responsibility of the purchasing department teams.
With SharePoint and Infowise Ultimate Forms, you can create a streamlined, automated system for handling purchase requests. The system will handle all the stages, from submission and approval to final procurement. This approach requires no coding and allows full customization based on your purchasing needs of your organization.
This guide will walk you through setting up a SharePoint form for purchase requests. We will discuss how we can automate approval workflows. We will also utilize alerts for keeping relevant parties informed throughout the process.
Step 1: Setting Up the Purchase Request Form in SharePoint
The first step is creating a SharePoint list to collect and manage purchase request data. You will further customize this list using Infowise Ultimate Forms.
You will use document libraries for organizing and managing documents related to purchase requests. That will provide quick access to important files and supporting features like version control and metadata tagging.
Configuring the Purchase Request List
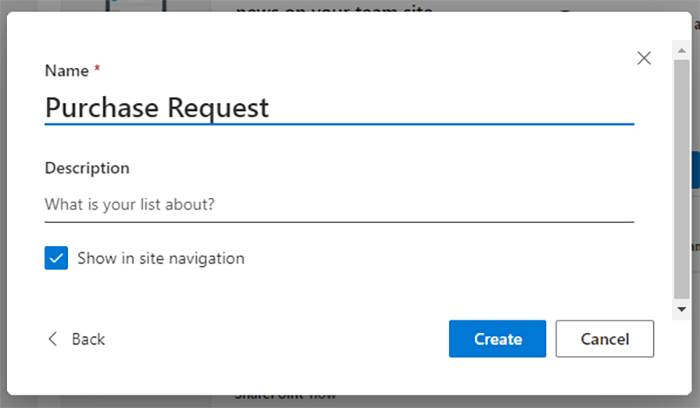
To create a new list in your SharePoint site:
- Go to Site Contents of your SharePoint site
- Click on New > List
- Name the list Purchase Requests
Ensure Ultimate Forms is present in your SharePoint site. You can install it quickly and easily using our Installation Wizard.
To access Infowise Form Designer:
- With the new Purchase Requests list open, click Design in the top toolbar.
- Click on Form Designer
- You can now choose to create a blank form or automatically generate a new form.
You can create all the needed columns in Form Designer. Just click on New Column on the left, then select the correct column type. At the minimum, create the following columns:
- Request Title - single line of text column
- Requested By - person or group column
- Department - choice or lookup column
- Item Description - single or multiple lines of text column
- Quantity - number column
- Total Cost - currency column
- Priority - choice column
- Status - choice column
- Payment terms - choice column
- Delivery date - date column
Ensure that you place the Attachments on the form. Users will be able to upload necessary documents, such as quotes or purchase orders.
Step 2: Setting Up Approval Workflows Using Actions
Automating the approval process ensures that purchase requests are reviewed promptly. Key stakeholders must take part in the design of the approval workflows. This helps ensure that the workflows meet the essential needs of the organization.
Infowise Ultimate Forms: Actions provides powerful tools for automating approvals and task assignments based on request data.
Automating Approval Tasks and Status Updates
In the Purchase Requests list, go to Design and then Actions under the Business Logic menu. Next, set up an action that assigns purchase request approval to the relevant department head or finance team. We will use actions of the type Update list item.
Use conditions based on columns like Priority or Total Cost. This will allow you to automatically send high-value or high-priority requests to the right approver. The approver must be the head of the procurement department, when the Total Cost is above a specific limit.
You can use Infowise Actions to update the Status field based on the approval outcome:
- Approved: Once the request is approved, set the status to "Approved" and trigger any subsequent procurement actions.
- Rejected: If rejected, update the status to "Rejected" and notify the requester.
Add Approval and Rejection Buttons
You can place Approve and Reject buttons directly on the form. This allows authorized personnel to approve or reject the request from within the form view. You can trigger an action directly from a button by selecting Trigger Action button type.
Step 3: Setting Up Alerts for Notifications
Notifications are essential for keeping all relevant parties updated on the status of purchase requests. Infowise Ultimate Forms: Alerts lets you configure custom notifications for specific stages of the purchasing workflow.
Navigate to Design > Alerts under Business Logic in Infowise Ultimate Forms.
Configuring Alerts for New Requests:
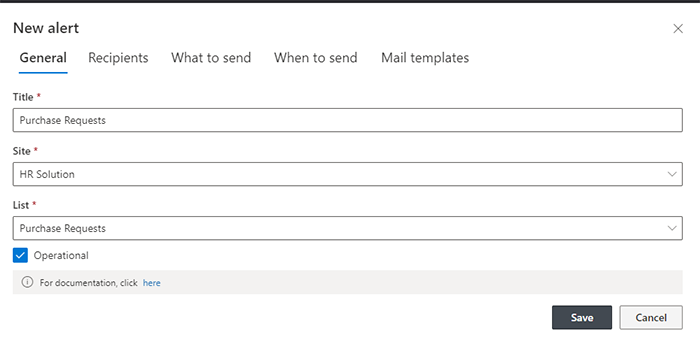
- Set up an alert to notify the finance team or the assigned approver when someone submits a new purchase request.
- Customize the email template to include dynamic fields like Request Title, Requested By, and Total Cost.
Automate Notifications for Status Changes
- Set up alerts for when the Status field changes, notifying the requester when their request is Approved or Rejected.
- Use conditions to ensure that only relevant users (such as the requester and their manager) receive notifications.
Set Up Reminders for Pending Approvals
- Configure an alert to remind the approver if a request remains pending beyond a certain timeframe (e.g., 48 hours).
- This helps ensure timely approvals and keeps the procurement process moving smoothly.
Step 4: Tracking and Reporting Purchase Request Status
To keep track of all purchase requests, create custom views and use Ultimate Forms alerts to monitor request status. This helps you generate timely reports for stakeholders.
Setting Up Custom Views for Real-Time Tracking
- Create a custom view in your Purchase Requests list. This view should show important details like Request Title, Requested By, Department, Total Cost, Priority, and Status.
- Organize the view to group requests by Status (e.g., Pending, Approved, Rejected) for quick reference.
Use Conditional Formatting
In Infowise Ultimate Forms, you can use color-coding for choice columns. This helps highlight requests by their status or priority. For example, you can add color coding for different statuses (green for approved, red for rejected, yellow for pending).
Automate Weekly Status Reports
- Use Infowise Ultimate Forms: Alerts to send a weekly summary email to relevant team members. The email will include all active and recent purchase requests.
- Configure the alert to include information like total pending requests, approval times, and high-priority items.
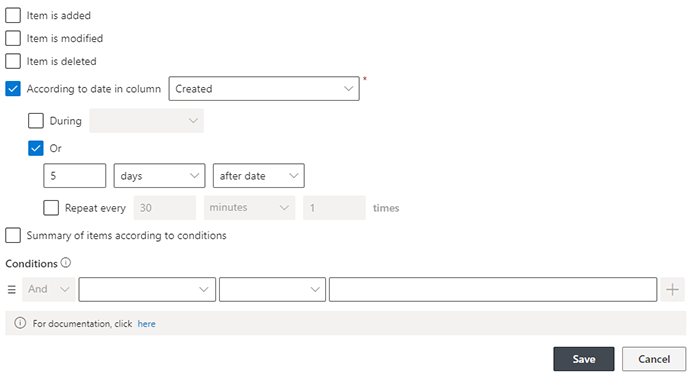
Set Up Notifications for Aging Requests:
- Set an Infowise Alert for requests that have remained in "Pending" status for a specified time (e.g., more than 5 days).
- This alert can notify the requester, their manager, or a finance team member, ensuring follow-ups on aging requests.
Resources
Before we wrap up, let’s look at a few key resources Infowise provides to help you get the most out of Ultimate Forms. We designed it to support every level of user, making it easy to customize and automate workflows in SharePoint.
Templates
Infowise provides pre-built templates to help you quickly launch solutions for common workflows like employee onboarding and approvals. These templates integrate smoothly with SharePoint, so you can start building effective processes right away. You can explore available templates here: Infowise Templates.
Tutorials
Infowise tutorials cover everything from setup to advanced customization. It makes it easy for users at all levels to leverage Ultimate Forms fully. You can view the full tutorial library here: Infowise Tutorials.
Webinars
Join Infowise webinars to learn from experts about real-world examples. Discover how to automate HR tasks and create custom workflows. You can sign up for the future webinars and watch the recorded past webinars here: Infowise Webinars.
Training
Infowise offers training resources to equip your team with best practices and essential skills. Choose from guided courses and self-paced options to fit your schedule. You can find additional information here: Infowise Training.
Conclusion
With Infowise Ultimate Forms and SharePoint, managing purchase requests becomes faster, more efficient, and fully automated. Your team can speed up purchase order processing by:
- Creating a custom purchase request form.
- Automating approval steps.
- Configuring email alerts to ensure better visibility into the procurement process.