
Hi all,
In this post I am going to demonstrate how you can create wiki index pages without any code.
SharePoint Wiki site template (both 2007 and 2010) is great for creating large information depositories with multiple interconnected articles. The very nature of the wiki in general emphasises the ability to easily browse the related article using the hyperlinks embedded into the body of the current article. But what if you needed just to browse the list of articles present in the system? Wiki is not hierarchic in nature and does not possess a table of content nor an index of terms.
But we can create one easily. We will use a regular view, which, depending on the parameter passed using the query string (the characters in the page's address, after the question mark :)). We will pass the first letter and see all the articles beginning with that letter.
First we need the index itself, looking something like this:
This is basically a Content Editor web part, created in a browser. Each letter/digit is a link to our view page, in the format https://[server]/Wiki Pages/forms/index.aspx?fl=A
where index.aspx is our view page and the "fl" (first letter) parameter takes the value of the clicked letter or digit.
Where do we put this web part? On the default page of course. In my case I completely customized this article and created a welcome page of sorts, including the index, a search box, Featured Article web part and even article categories. Under SharePoint 2007 you need to edit the page in SharePoint Designer to add web part zone, in 2010 it is not needed as the wiki text editor now allows web parts as well as text (which is really cool BTW).
Now it is time to create our view. Go to View All Site Content and locate the wiki library. Open it and create a new view, name it Index (the name does not matter obviously, just as long as the URL is the same as the one that we used in the Index web part).
The view should only include the Name (linked to document) field. Sort the items by Name.
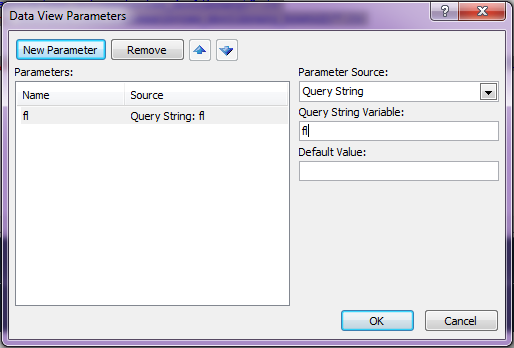
Now we need to make the view aware of the query string parameter we pass.
- Open the view page in SharePoint Designer
- Convert the view web part into XSLT
- Delete all unnecessary elements, such as column title
- Add new Query String parameter names "fl"
- Add new filter: Name column start with the value of the "fl" parameter.
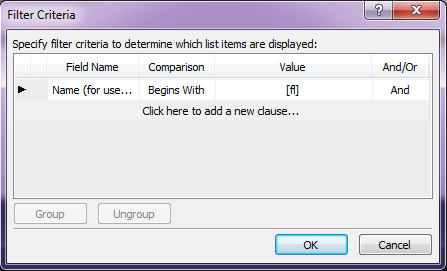
- This is it, now you will see all the articles starting with the letter you clicked on