
My SharePoint Background
As a skilled SharePoint developer, I have spent years customizing forms and workflows. My goal is to speed up business processes and improve user experiences. The ability to customize SharePoint to fit individual organizational demands has always been a challenging and rewarding endeavor.
Today, I'll discuss how to create custom SharePoint forms and implement business processes with Ultimate Forms. With this tool you can greatly simplify and speed up the whole process. Ultimate Forms works in both SharePoint Online (Microsoft 365) and on premises. It combines all the functionality you need to implement the whole business process in one place.
Project Experience
One of the most major projects I worked on was with a huge financial organization. To manage the loan approval process, the customer requested a bespoke form and workflow solution. We based the solution entirely on SharePoint lists and document libraries.
The complexity came from needing to combine many approval phases, alerts, and the SharePoint form layout. The layout frequently changed based on user input.
Initially, we utilized SharePoint Designer for our to design SharePoint forms and implement the necessary workflows. However, this method was time-consuming and prone to mistakes. Because of the intensive testing and debugging required, even minor changes might cause severe delay.
Managing permissions and making forms mobile-friendly introduced an extra degree of complexity. SharePoint Designer did not include the ability to create responsive mobile forms. While we eventually produced a viable solution, the process demonstrated the limits of traditional methodologies.
Customization Guide
Using Ultimate Forms, the customization of forms and workflows becomes much more manageable. Here is a step-by-step guide on how to design custom SharePoint forms and implement workflows using this powerful tool. During this process you will not need any additional tools and you won't be writing any code.
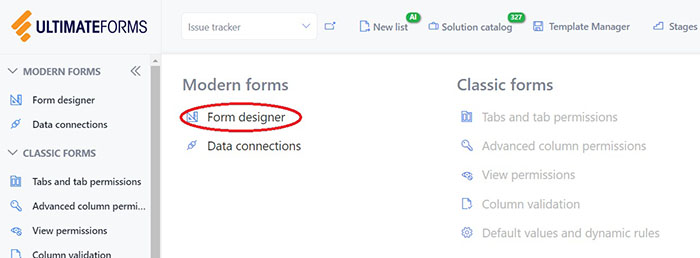
1. Accessing the Form Designer
- Start by navigating to the SharePoint site of your choosing.
- Go to the list or library where you want to customize the form.
- Click on Design from the SharePoint list toolbar, and then select Form Designer.
2. Creating a New Form
- Choose whether you want to create a form from scratch or let it generate an initial simple form for you. The resulting form will then simply include all the columns found in the SharePoint list. You will be able to modify its layout and look in the following steps.
3. Designing the Form Layout
- Drag and drop columns and controls from the left panel onto the design surface. Form Designer offer a wide selection of controls, including containers, tabs, buttons, and fragments and some additional elements.
TIP: you can place any list column on the design canvas of the form in more than one location. Simply click on the lock icon above the column gallery to enable this option. - Use the properties pane on the right to configure each control. You can set permissions, styles, and behaviors based on user roles or conditions. The rules will execute in real time, changing the form and its values as the users interact with it. You can easily accomplish common requirements, such as conditional formatting, using dynamic style rules.

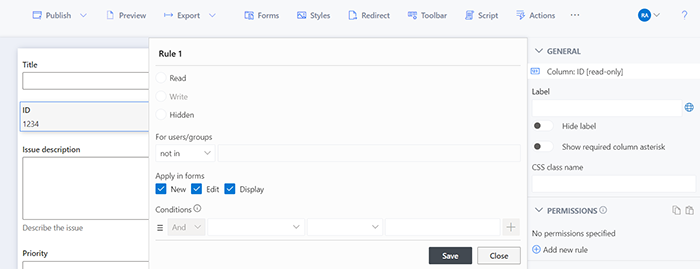
4. Adding Permissions, Dynamic Rules and Validations
- Define permission rules to change column behavior based on user input or other criteria. For example, you can set a column to become visible only when a certain condition is met. You can also completely hide a column unless certain conditions apply.
- Define dynamic rules to set column values automatically based on other column values. You can also use these rules to set values to read-only columns.
- Define validation rules to ensure high quality input. Similarly to permission and dynamic rules, you can add conditions to apply validation rules selectively. You can validate column according to patterns, in comparison with other columns and according to value length.
- All rules are fully dynamic. The form will re-apply them immediately whenever the user changes any of the column values.
5. Workflow Automation
Actions provide an alternative to the traditional workflow approach to automation. Instead of designing complex multi-stage workflows, you define your automation as a set of individual independent action. Each action has its own triggers and conditions for execution. This makes both the initial configuration and later changes easier and faster.
- Access the Actions component from the Business Logic section.
- Select from the wide selection of available action types. Over 20 types are available, such as updating list items, sending emails, running workflows, or managing permissions. You can even use action to work with data stored in external applications and databases.
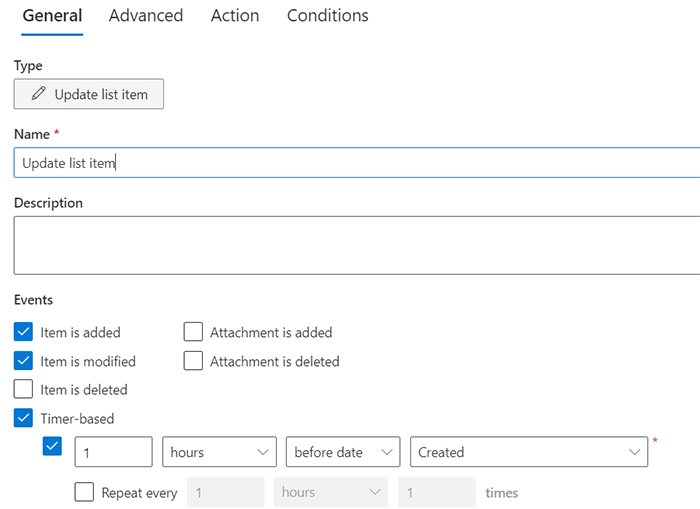
- Select how you want your action to begin execution. It can respond to a change in a SharePoint list item, for example, when a user adds or modifies an item. You can use a timer to execute actions based on a date in column or an interval. You can also allow user to start actions manually by pressing a button on the SharePoint form.
- Each action will contain its own set of properties for you to define. For example, Update list item will allow you to define:
- which columns you want to update
- and what values you want to set them to
- Optionally set conditions for the action. You can even set a condition to track a change in a certain column value.
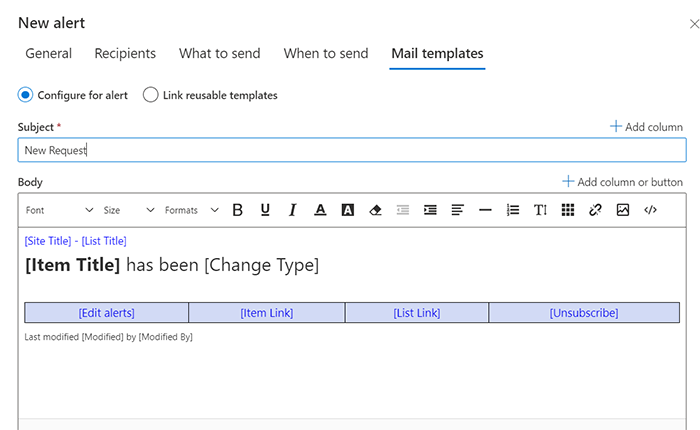
6. Using Alerts for Notifications
- Set up alerts to notify users about changes in SharePoint list items. You can also sent notification based on a date in column.
- Customize email templates to determine how the email will appear. In them you can include placeholders, selected from a convenient picker. When the alert executes, it replaces the placeholder with data from the SharePoint list item.
7. Publishing and Testing
- You can use the "Preview" function to test the form in different scenarios and devices to ensure it behaves as expected. The forms are all always responsive and will automatically adjust to the screen size without any loss of functionality.
- Once satisfied, click "Publish" to make deploy the form to your SharePoint list.
Best Practices
When customizing your SharePoint forms and workflows, consider the following best practices to ensure effective and efficient solutions:
- Plan Thoroughly: Before diving into customization, map out the entire process. Understand the user requirements and the business logic thoroughly.
- Use Templates: Leverage existing templates to save time and ensure consistency across forms.
- Test Extensively: Use the preview and test functionalities to catch issues early. Test under different user roles and conditions.
- Document Your Work: Maintain clear documentation of all customizations. This will be invaluable for future updates and troubleshooting.
- Keep It Simple: Try to avoid void over-complicating forms and workflows. Simplicity enhances usability and reduces the chance of errors.
Conclusion
Ultimate Forms makes it easier to customize forms and processes in SharePoint than ever before. The easy interface, along with strong capabilities, enables the development of complicated solutions without substantial code. Using the methods and best practices above can help you make your operations smoother. This will improve the user experience and save time.
I recommend you to look at Ultimate Forms for your next project. The advantages of effective SharePoint form and workflow customisation are numerous, and this tool may considerably improve your SharePoint development experience. I hope you have success in your form building activities!