
Introduction
I've been writing a LOT of articles targeting advanced features of Ultimate Forms. The idea is to help our customers leverage their SharePoint to automate and streamline business processes in their organizations. I have always assumed that my audience understands what Ultimate Forms is and how to use it.
Today I want to address those for whom these are the crucial first steps in their journey. I know that learning something new can feel overwhelming. I will keep it simple and not assume you have any prior knowledge.
In this article, I will guide you through your first experience with Ultimate Forms. We will cover installation, designing, and publishing your first SharePoint form.
Infowise Ultimate Forms contains a wide array of components. These cover the form, business logic side and web part page aspects of SharePoint development needs. Our customer often use both as a Power Apps alternative (or Power Automate alternative). Or they might use it as a complementary to the latter.
We designed Infowise Ultimate Forms with the regular users in mind. Therefore, we try to avoid complex syntax as much as possible and rely only on visual configurations.
Installation
We dedicated a lot of effort into making the installation process as simple as possible. Both in Microsoft 365 and on premises, the installation takes a form of a wizard that guides you through the process.
You should start by clicking Try Now Free button in the top-right corner of this page.
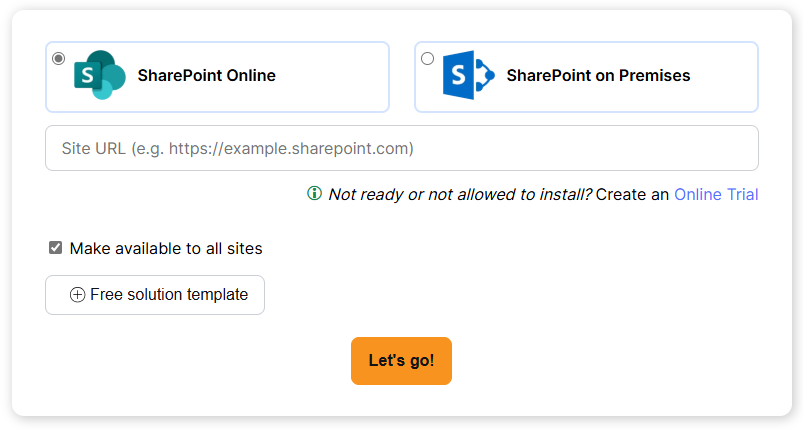
Installation in your own tenant requires Global Administrator privileges. If you are not an administrator, there is ane easy solution for you as well. You are able to select the option of creating an online demo.
When you choose to do so, we will build a dedicated SharePoint site just for you in our own demo tenant. You will be able to try all the features for 30 days, free of charge. This process is fast, easy and requires no special permissions.
If you are an administrator and want to work with your real data in your own environment, you need to install.
- If you are on premises, fill out the form and download the installer. Connect to one of your SharePoint front-end server, execute the installer and follow the prompts. You do not need to make changes to the default settings.
- If you are on Microsoft 365, enter the URL of one of your SharePoint sites (such as https://example.sharepoint.com). The installer will prompt you for permissions. A few seconds later, the installation will conclude.
Note for Microsoft 365 customers: you can also optionally pre-install one of our free business solution templates. This gives you the ability to immediately start working with a real world business solutions. If you are on premises, you can also install one of these free solutions, but in this case directly from within the app.
Getting Started
Now we are ready to create a SharePoint form.
Navigate to a SharePoint site of your choosing using your browser. Continue to any existing list and you will find the Design button in the list toolbar. This is your entry point for all the configuration settings of Ultimate Forms. The app will provide you with the ability to configure forms, actions, alerts, print templates and many other components.

If it's your first time using Ultimate Forms, the experience is slightly different. The app will show the "Let's Get Started" welcome screen instead of the regular homepage. This will help you create your first SharePoint list and form in the fastest way possible.
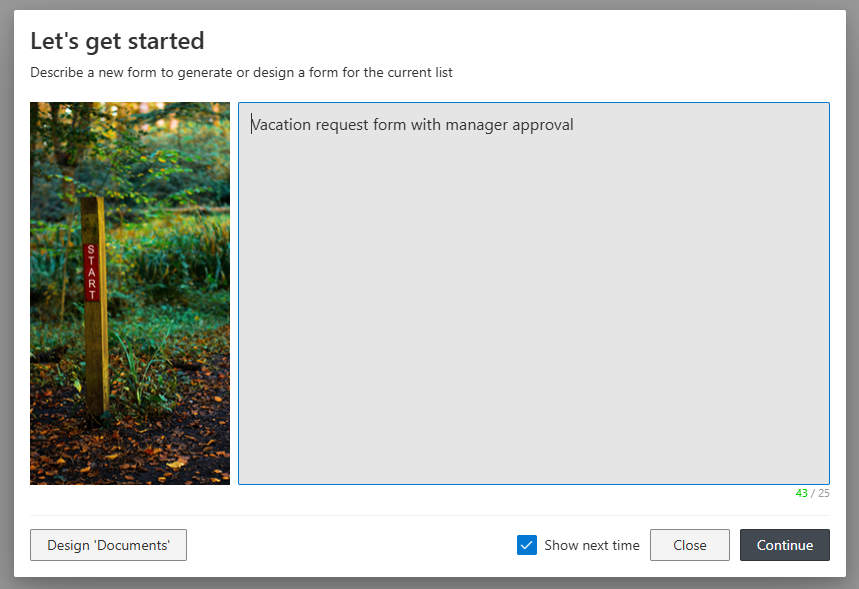
Here, you can create a new list with our AI-assisted Form Generator. You can also design the form for the current list you navigated from.
With the Form Generator, you simply describe the form you need and the AI engine will suggest the most common columns for it. This feature is simple to use and is great to creating a large number of columns. You can also use it to gather ideas for your new form.
I would suggest to enter prompts as detailed as possible. That will allow the AI engine to locate columns most suitable for your needs. You do not need to describe columns and their types. You just need to focus on the type of information you want to gather in general.
We already pre-filled the description for you. You just can simply click Continue and proceed to creating a vacation request form (and who doesn't like those!). You can also clear the default prompt and enter anything else, according to your specific needs. You can skip straight to Form Designer section of this blog if you chose to design a form for the current SharePoint list instead.
I recommend using Form Generator every time you want to create a new SharePoint list and its form. Even when you are not planning to use the AI engine, it will help you streamline the process and save precious time.
Form Generator
Once you click on Continue, the system will create a list of suggested columns. This list will be different each time and will look quite similar to this:
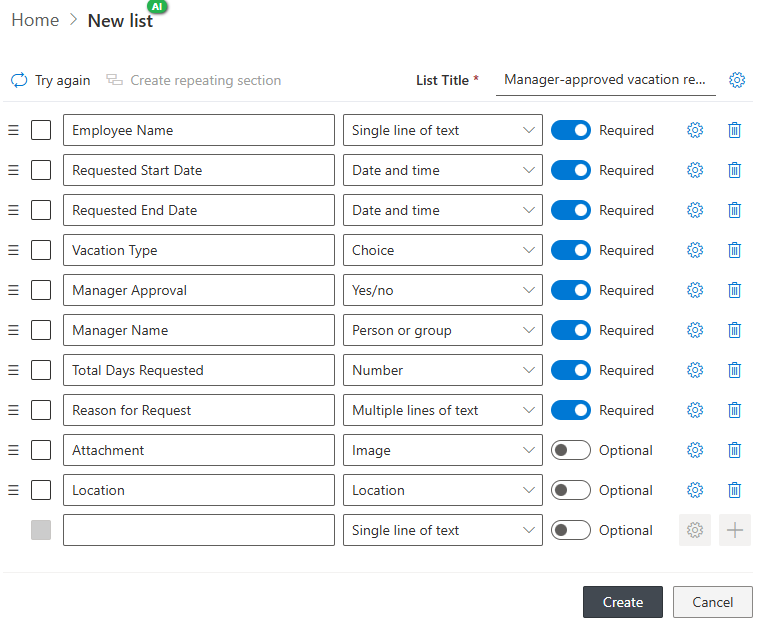
Feel free to re-order, add, delete and modify columns as you see fit. Once you become more comfortable with using it, you can delve into creating repeating sections, permissions or validation rules. But for now, let's focus on creating and configuring columns.
Once happy with the result, click on Create to actually add the new list to your SharePoint site. You are now ready to use Form Designer to further embellish your new form.
Form Designer
Here you can decide on the layout, styling and behavior of your new form.
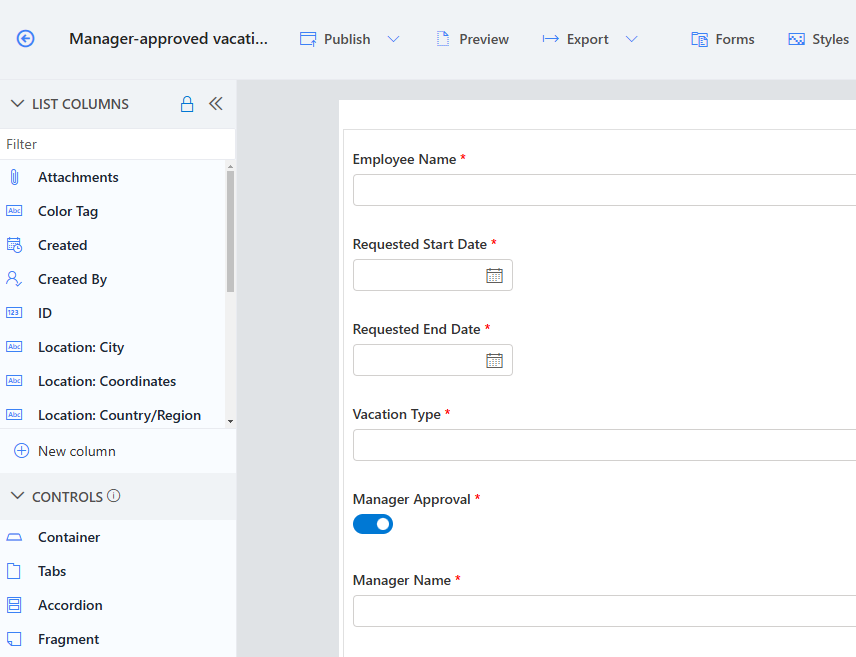
Tip: use Containers to exercise precise control over the form layout. You can set how many layout columns each container will have to place SharePoint list columns side-by-side. You can also assign styles and theming to each container and even place containers within containers.
Additionally, I suggest that experiment with using Tabs or Accordions. You can also add text and images to guide your users or even add buttons to accomplish tasks. Once you feel more adventurous, consider adding rules and permissions. These will help to automatically set column values or show/hide columns under certain conditions.
Once you have reached the desired result, proceed to clicking on Publish. Within seconds the app will add the new form to your SharePoint list/document library. You do not need to configure anything else. The New button on your SharePoint list will now take your users to the brand new custom SharePoint form.
Final Thoughts
Ease of use is one of the most important aspects of Ultimate Forms. We know you have a lot on your plate. We want to make working with SharePoint forms and workflows easy for you.
Our goal is to keep the learning curve low. We encourage you to get in touch with us with your thoughts and suggestions!