
Introduction
Expense Report is one of the most common forms that almost any organization needs. You want to be able to quickly and easily report your business expenses and then route the form for approval. You would not believe how many places, even today, still use pen and paper, Excel or Word documents! Not everyone has the skills and the knowledge to build a robust modern solution for this common need.
But with SharePoint it's all so much easier. It's a great collaboration platform that is designed from the ground up to handle data and processes in shared, multi-user environment, while still preserving the necessary security restrictions. SharePoint out of the box is a great starting point for many business solutions and a lot can be done using SharePoint Designer or custom development. However, it's not always easy to build something slightly more advanced. For instance, multiple line items within the expense report or dynamic routing (when the approver is set dynamically based on the department) are certainly challenges that might have you scratching your head.
In this blog I will provide you with step-by-step instructions on how to build a real life expense report, complete with an approval stage. I will be using our product, Ultimate Forms, to add the necessary extra on top of regular SharePoint lists to make sure the process works exactly how I need it to work.
Here’s what we’ll implement:
- Expense Report creation: Some of my information, such as my name, will be automatically pre-filled.
- Line items in the form: Users can add line items directly within the form without needing to save first.
- Automatic calculations: The summary will be dynamically calculated based on line items.
- Dynamic approval: The manager is determined automatically based on the selected department.
- Email notifications: Managers will receive approval requests, and employees will be notified of approval or rejection.
Our finished form will look something like this: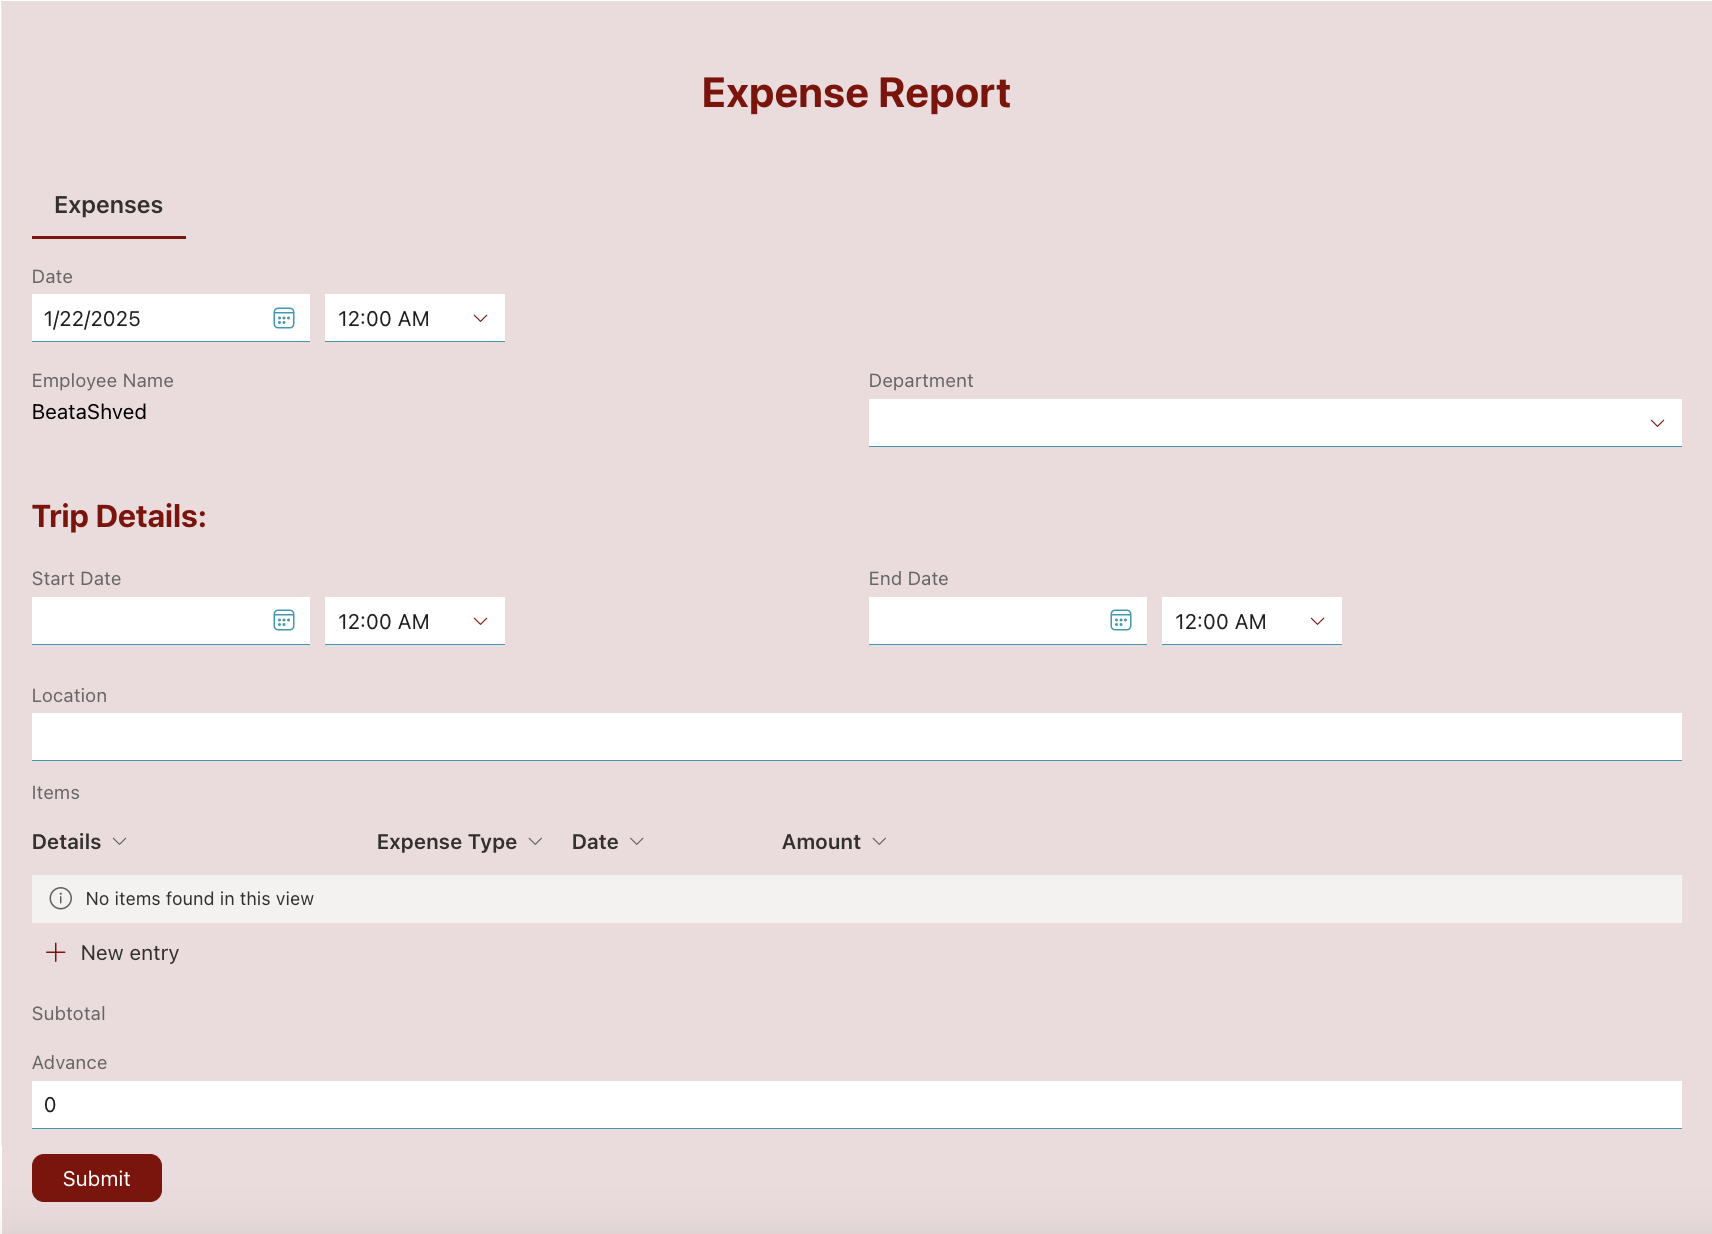
Cool, right? :)
So let's start! I will be using the Microsoft 365 add-in version of Ultimate Forms, but you can do exactly the same on premises as well.
Step 1: Create the Necessary Lists
To build this solution, we need three SharePoint lists: Departments, Line Items, and Expense Reports.
Departments
This list will contain the various departments our employees belong to. It will then be used as a lookup source for our Department column in the Expense Reports list. We will start with a regular Custom list and just add one column of type Person or Group and call it Manager. Itwill hold the manager for the department

Line Items
This list will contain the line items for the expense report. We will start by create a new Custom list. To allow the parent and the child lists to create and maintain a relationship, we will need to replace the default Item content type with our special Infowise Associated Item content type. It contains a set of special hidden columns that allow us to create the relationship between the child and the parent items. To replace the content type do the following:
- Create a custom list.
- Go to List Settings
- Create a custom list.
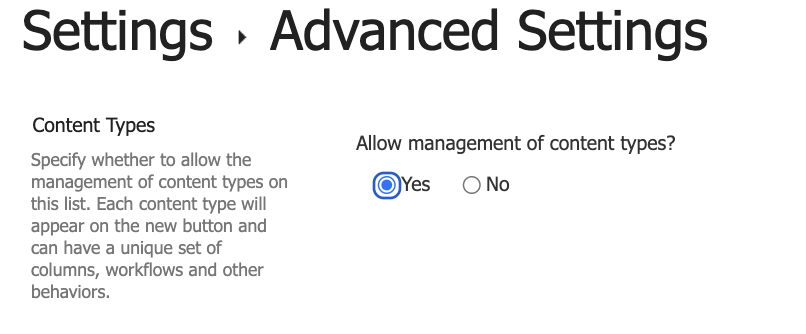
- Go to Advanced Settings
- Choose Yes for Allow management of content types (the first option on the page)
- Save
- Under List Settings you will now see a new section for managing content types. Click on "Add from existing site content types".
- Select "Infowise Associated Item" content type and save
- Back on List Settings, click on Item content type and then delete it from the list

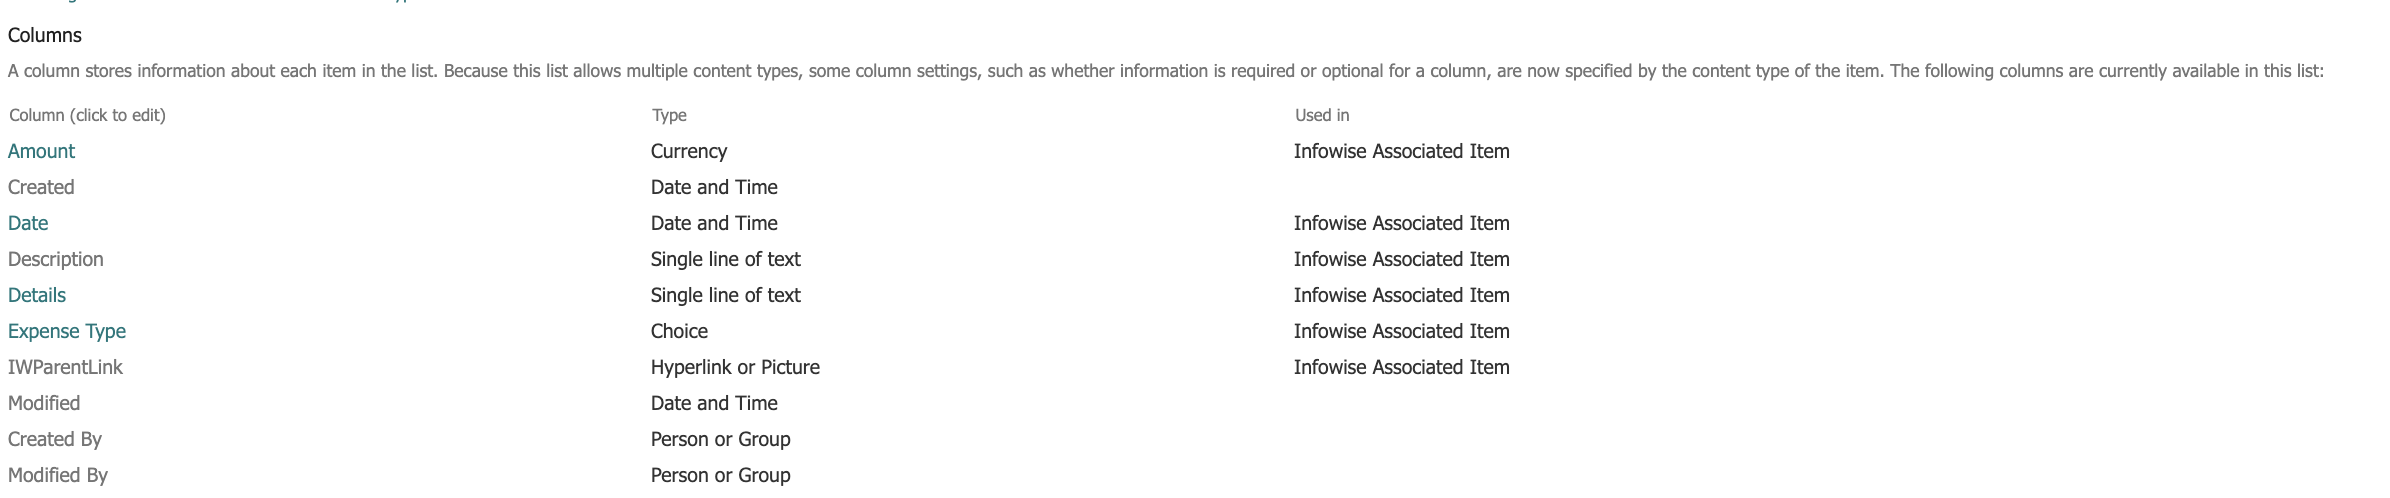
- Configure columns:
- Rename Title to Details
- Add a choice column Expense Type and fill the choices you want (such as Fare, Lodging, Meals, Entertainment, etc.)
- Add a date colum Date
- Add a currency column Amount
Expense Report
The main list holding all the data regarding the expense reports, excluding the line items. Start by creating a new Custom list.
Now let's configure the columns:
- Report ID: Rename the Title column.
- Date: A Date column, defaulted to Today.
- Employee Name: Using Ultimate Forms add a new User Property column named Employee Name. It will be used to automatically prefill the submitter'sname. In the Microsoft 365 add-in version, you can use the following formula:[FirstName] [LastName]. In the on-premises version you can do the same to fetch the data from SharePoint Profile service, or, if using Foundation, directly from Active Directory: [givenName] [sn]
- Department: Add a lookup column Department using the Departments list, make it required
- Location: A Single Line of Text column (to specify where the expenses took place)
- Start Date and End Date: Date columns.
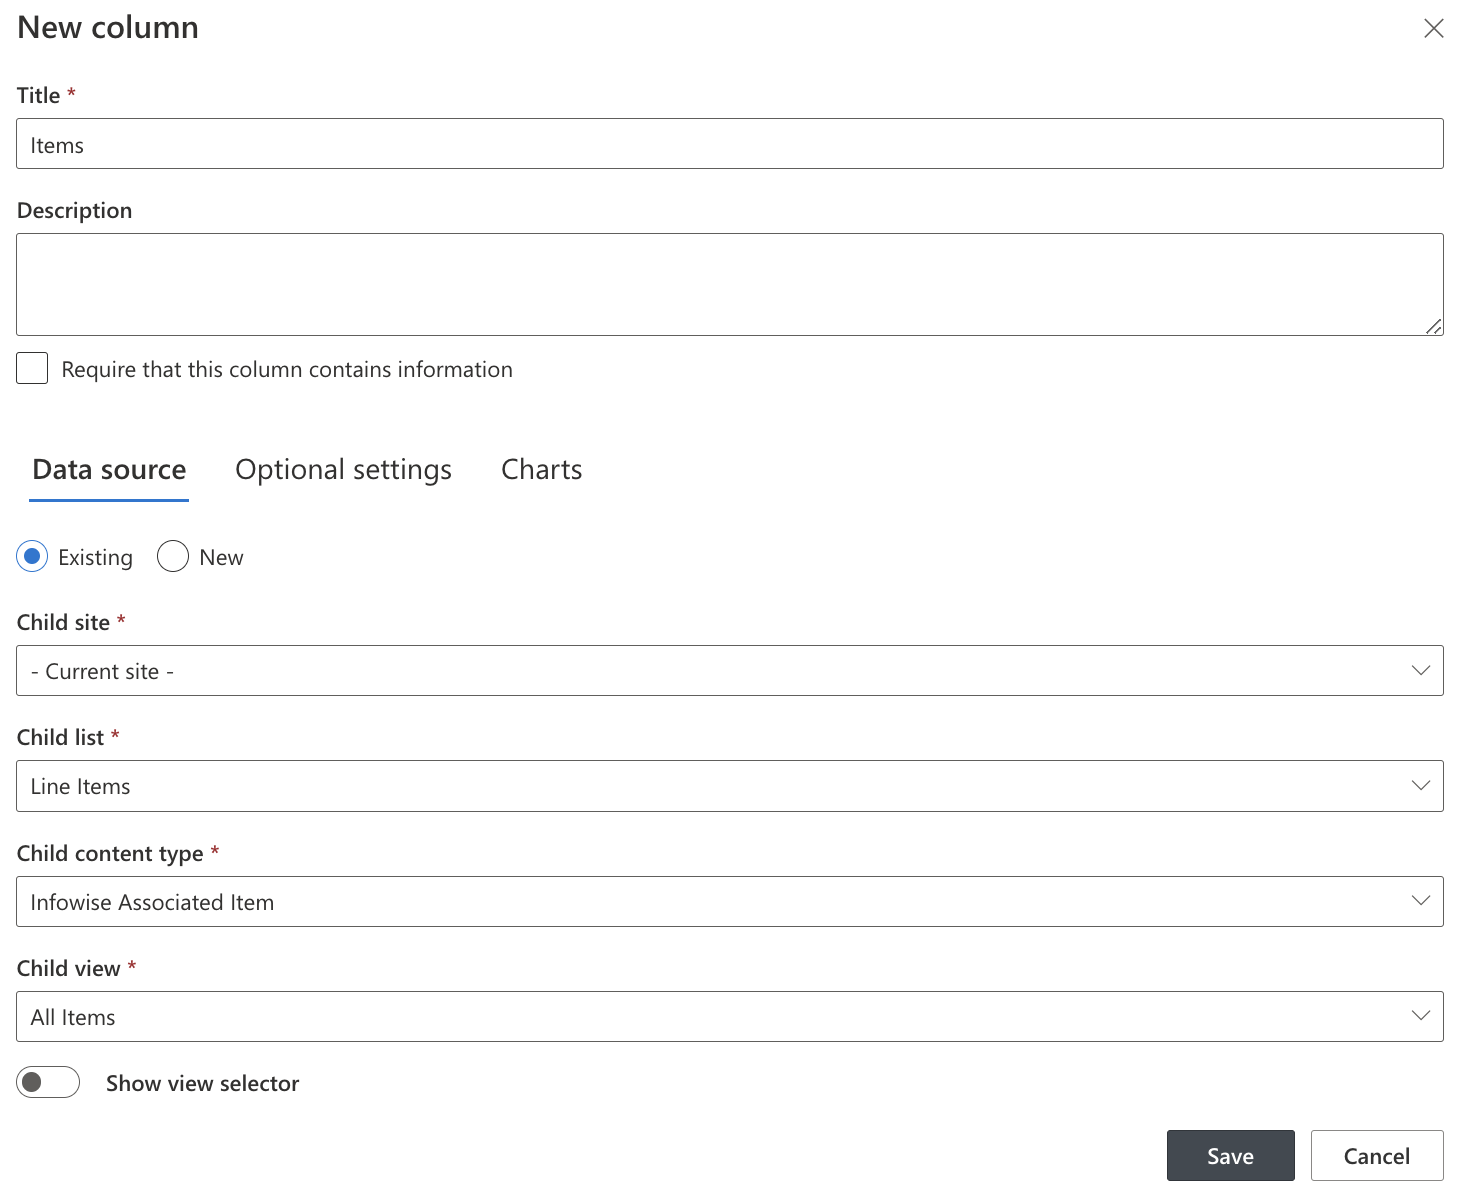
- Items: Using Ultimate Forms add a new Associated Items column named Items. It will point to our Line Items list and use the Infowise Associated Items content type
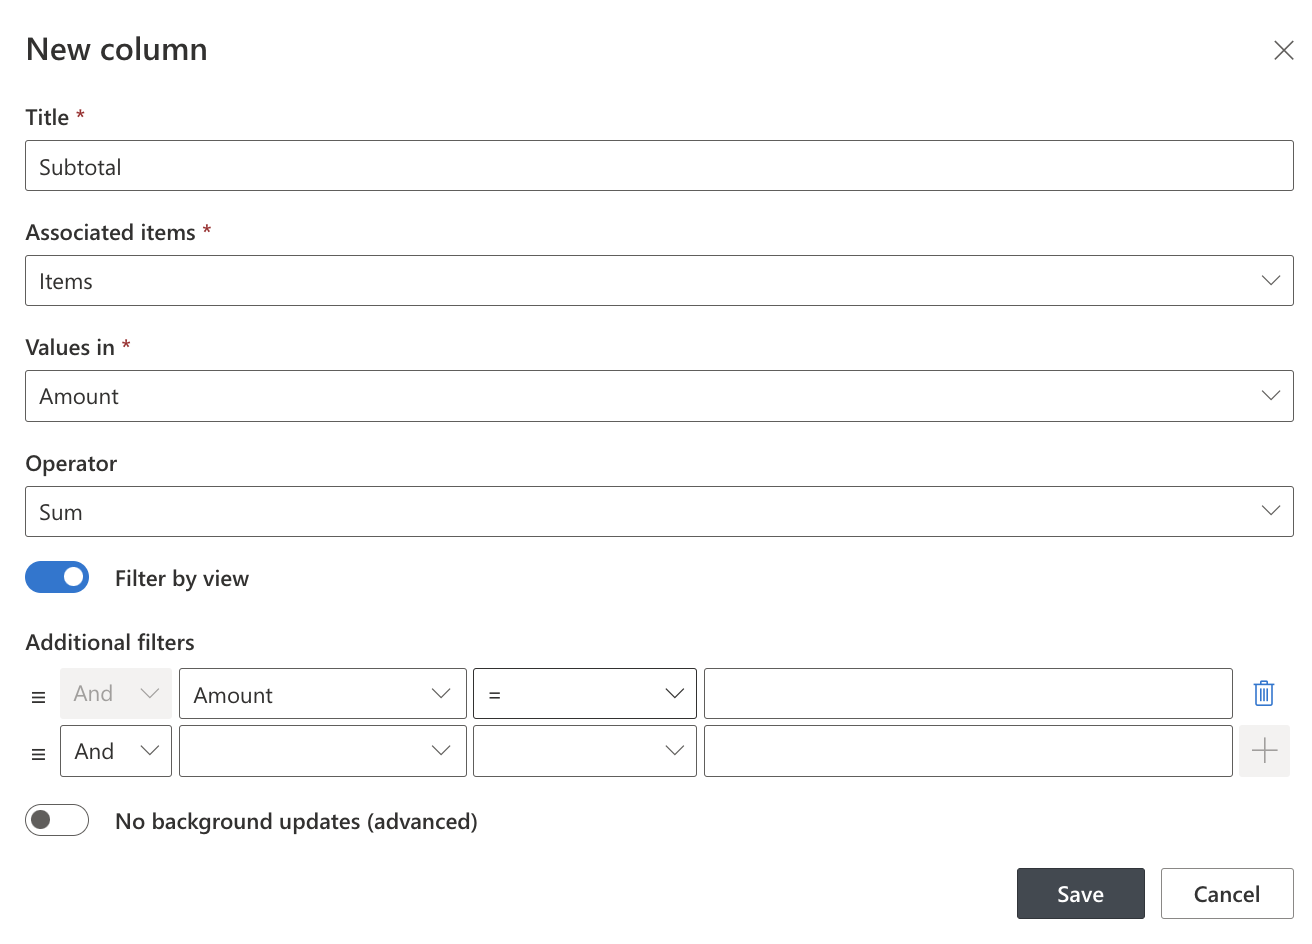
- Subtotal: Using Ultimate Forms add a new Associated Items Summary column named Subtotal. It will calculate a Sum of the Amount column in Items
- Advance: A Currency column defaulted to 0.
- Total: A Calculated column using the formula =Subtotal - Advance, set the display format to Currency
- Approval Status: A choice column, add choices N/a, Approved and Rejected, make it required and make sure N/a is the default
- Approval Date: A Date column.
- Approval Comments: A Multiple Lines of Text column.
That's it, all our lists are created, so we can start turning them into an actual business application.
Step 2: Configuring Form
Well, we actually just need to configure one form, the Expense Report itself.
First, let's configure automatic numbering for Report ID. This way each report will have a unique identifier. I used the format EXR-<submitter name>-<year>-<numerator>, but you can use any other format you like.
- Go to Expense Reports list
- On the List ribbon click on Ultimate Forms' Design button
- Under Configure Business Logic click on Item IDs
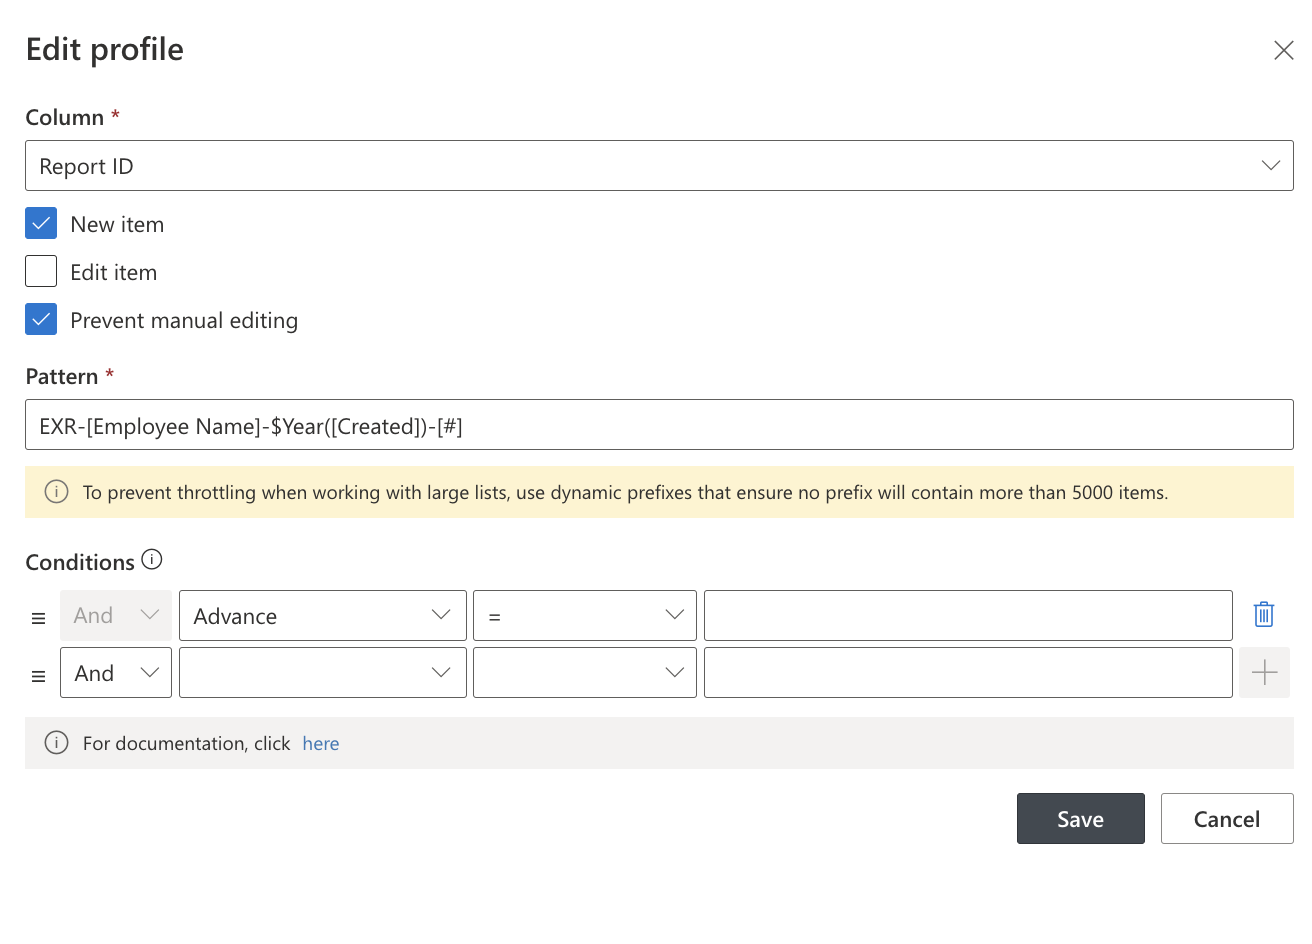
- Add a new rule for Report ID column. Set it to run on New item and check Prevent manual editing. Under Pattern enter: EXR-[Employee Name]-$Year([Created])-[#]
- Save
Next, let's configure the tabs and tab permissions. This will ensure users can only update the information they are allowed to.
- Go to Expense Reports list
- On the List ribbon click on Ultimate Forms' Design button
- Under Modern Forms click on Form designer
- Add header Expense Report
- Add a new tab Expenses
- Add the following columns to appear on the tab: (To fit two or more columns in a single line, you can use a container.)
1. Employee Name
2. Date
3. Department
4. Add section: Trip Details
5. Start Date
6. End Date
7. Location
8. Items
9. Subtotal
10. Advance
11. Total

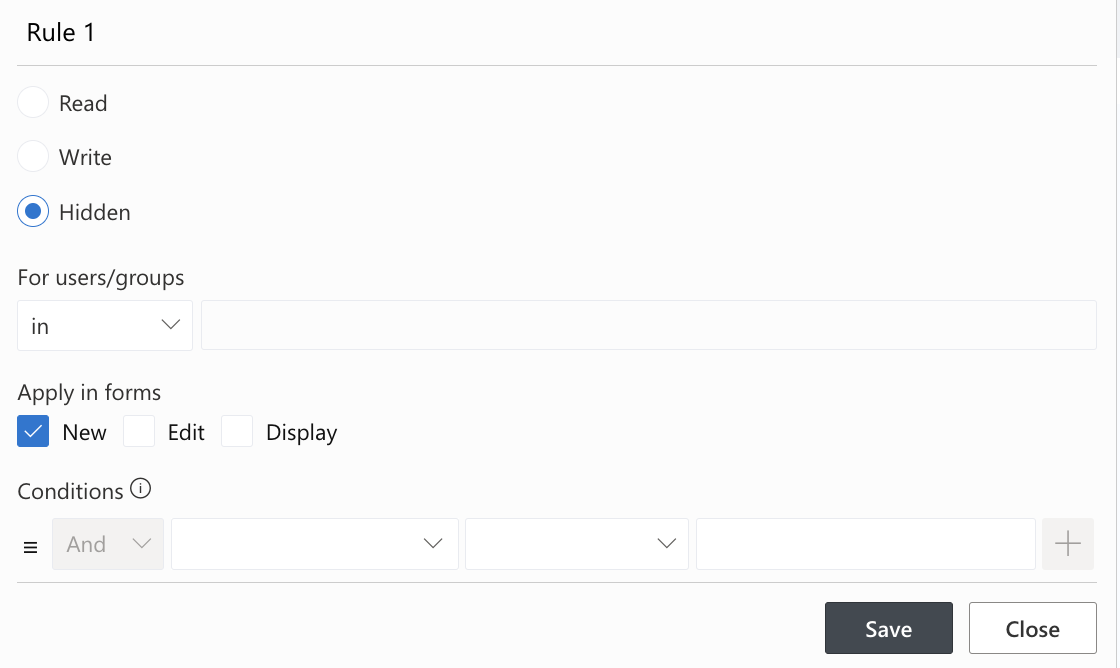
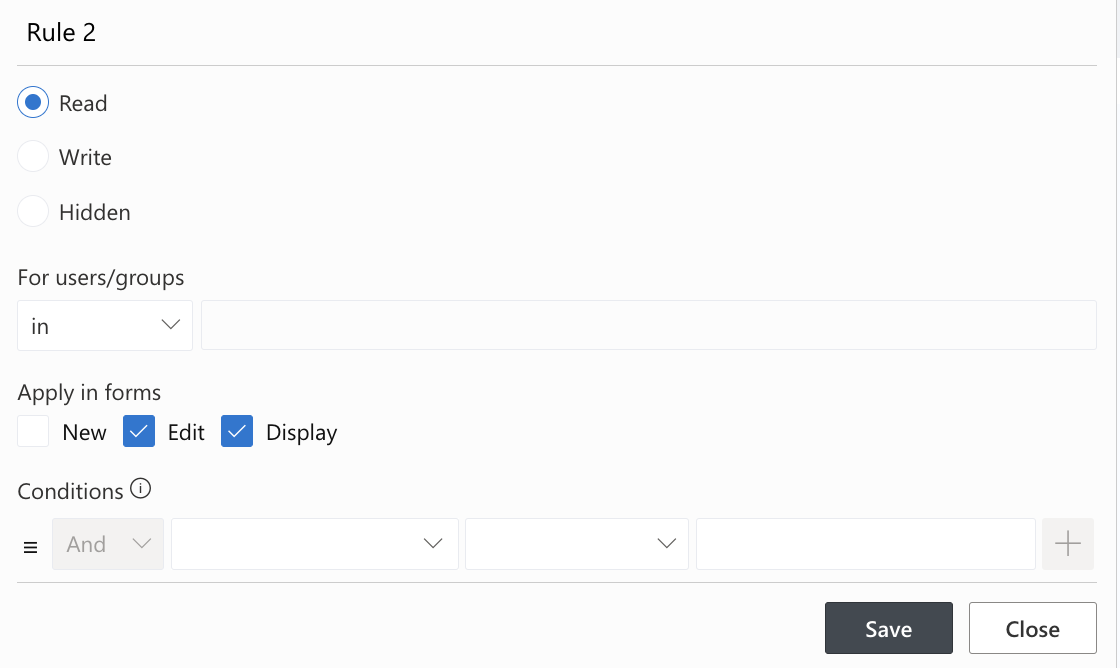
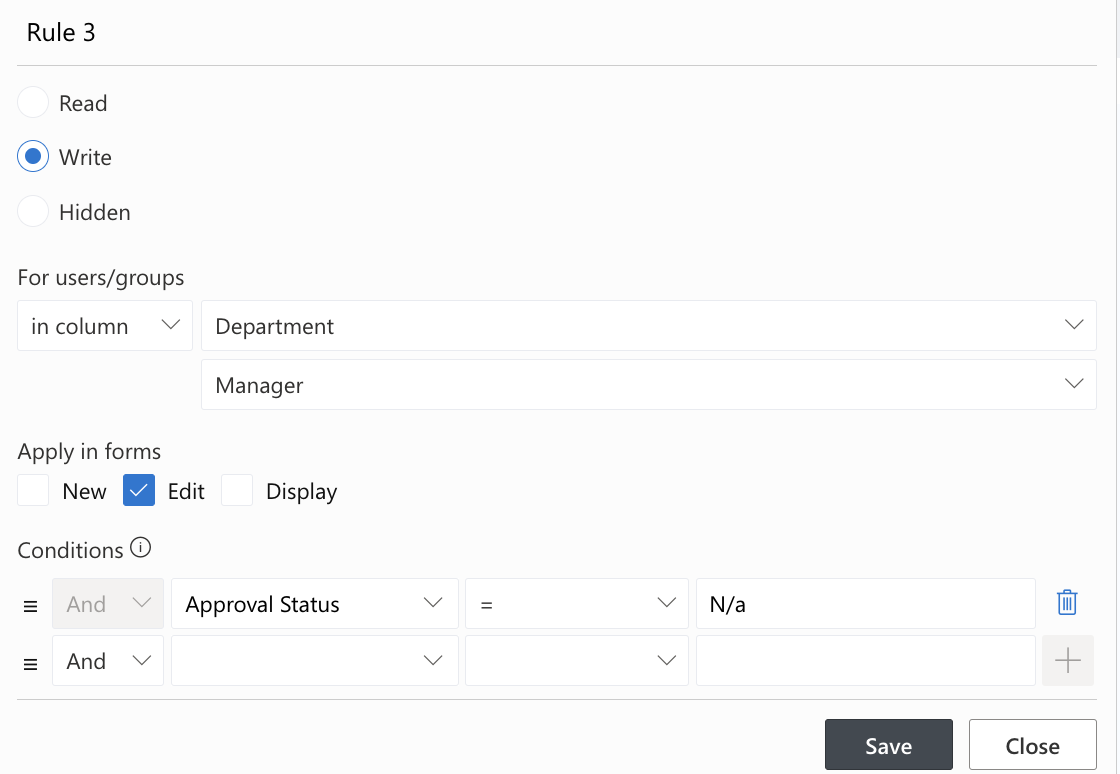
- In Tab Permissions, add the following rules:

.png)
- Add a new tab Approval
- Add the following columns to appear on the tab:
1. Approval Status
2. Approval Date
3. Approval Comments
-
In Tab Permissions add the following rules:
-
In Style you can choose theme would you like
-
For extra credit, let's apply custom styling to the form to make it really stand out. You can make use of the styles described in this article.
-
In the end, click Publish
Step 3: Configuring Alert
Set up two alerts:
- Manager Notification: Sends an email to the manager when an expense report is submitted.
- Submitter Notification: Notifies the submitter when the report is approved or rejected.
Alert #1
- Go to Expense Reports list
- On List ribbon click on Add Alert button
- Under Recipients remove yourself from To box
- Click on box to add a new recipient
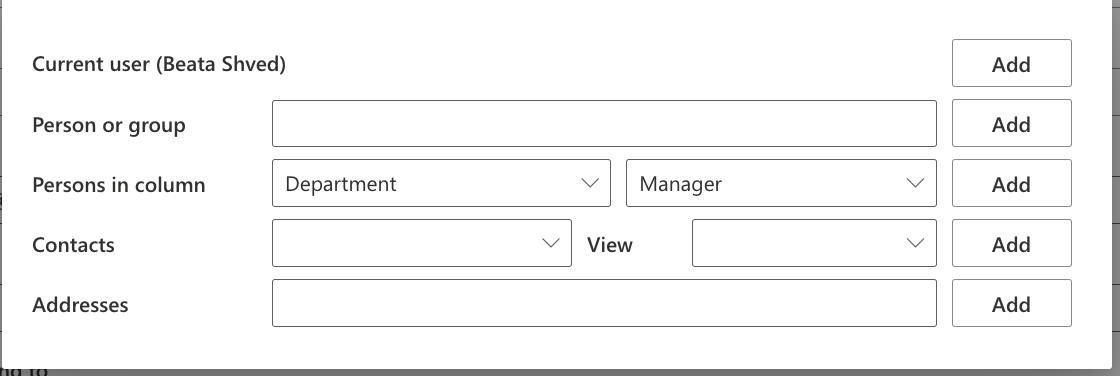
- Under Person in column select Department and then in the additional selector – Manager and clik Add
- Under What to send clear everything but Item is added
- Under Email Content create your own email template, it can contain text, column values and special functions (such as Edit Item link)
.png)
- Save the alert
Alert #2
- Go to Expense Reports list
- On List ribbon click on Add Alert button
- Under Recipients remove yourself from To box
- Click on box to add a new recipient
- Under Person in column select Created By and click • Under What to send clear everything by Item is modified
- Under Conditions add Approval Status after change not equals N/a - that will make sure the alert is only sent when an approval decision is made
- Under Email Content create your own email template, it can contain text, column values and special functions
- Save the alert
That's it! Your Expense Report system is ready for action!