
Hi,
Smart Action Pro is a great tool for automating business processes without any custom development. With 14 different action types at your disposal you can create/update list items, manage permissions, create lists/sites, manage Active Directory, generate print-outs and reports and much much more, and all using just your browser.
In this article I'm going to show how easy it is to generate wiki-based knowledge base articles with just one mouse click. This is actually the same approach that we use in our Help Desk site template, you can try it on our demo server.
Our KB article uses an actual support ticket as its basis. In that ticket (basically a custom list item) we document the steps we took while handling the support call. We use a rich-text column operating in Append mode (meaning that each time we edit the item, we add another entry to that column. Once we are done, we just click on a "Create KB" action column to run the necessary actions to create a new wiki page. The body of the new wiki page is based on the compiled steps from the rich-text column. Once it's created, we can edit it manually to give a more article-like feel (unfortunately computers are not capable of that, yet  )
)
How will that work:
- Create a custom list where you will manage your tickets. Add any columns you might find useful, such as customer name, date, status and so on.
- Enable versioning on our ticket list. This is required for enabling Append mode in our rich-text column
- Add a rich-text column, call it Comments, enable
- Add a rich-text column, call it All Comments, do not enable Append. We will use this column to store the complete list of resolution steps, copied from Comments. Using Smart List Pro or through content types settings make this column hidden.
- Add a choice column, named KB Article, with values Yes and No, clear the default value and make this column hidden as well. We will use this column as a flag for our actions to trigger KB conversion.
- Create a wiki library and call it Knowledge Base.
We are now ready to configure our actions:
- Go to List Settings and click on Actions settings
- If it's the first time you are adding actions to the list, you need to create an Action column, simply click on OK on the "Create new column" row, the default name Actions needs not to be changed.
- Create a new Update list item action and name it Append Comments. This action will automatically copy new entries from the Comments column into All Comments column.
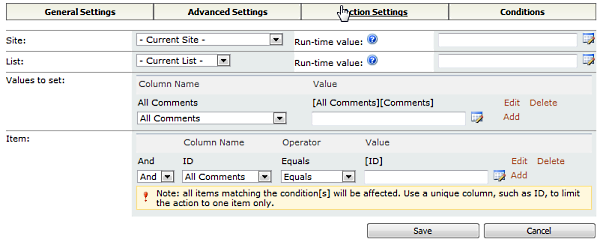
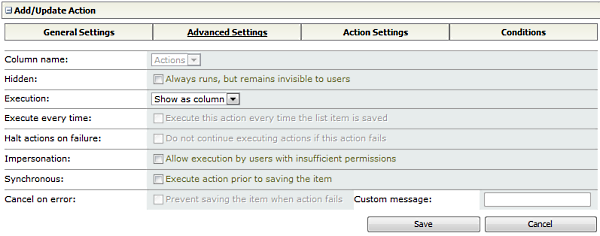
- Create a new Update list item action, name it Create KB and specify Show as column on the Advanced tab. Also uncheck Execute every time to make it run only once (we don't need more than one KB article per ticket).
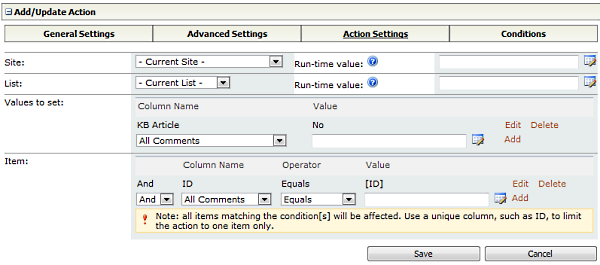
- In Action Settings, change the value of the flag column to trigger subsequent actions
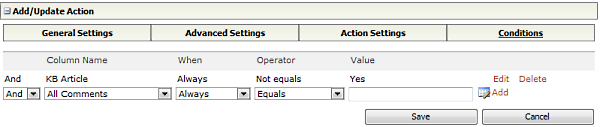
- As a precaution, add a condition to test for the flag value
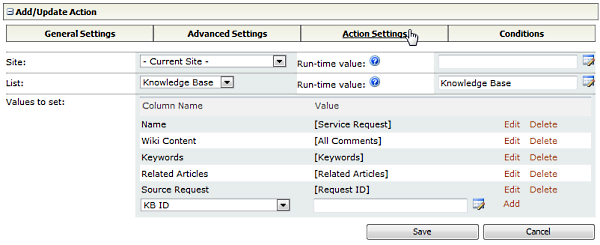
- Create a new Create list item action, name it Generate Article. Mark it Hidden in Advanced Settings and fill in the following settings
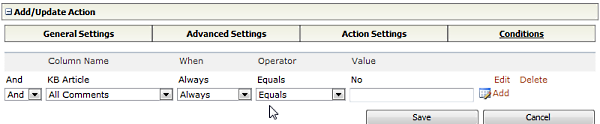
- Add a condition to test for the flag value
- Create a new Update list item action and name it Link KB. Mark it Hidden in Advanced Settings. This action will change the flag setting to Yes, this means that a KB article has already been created and will prevent actions from running again.
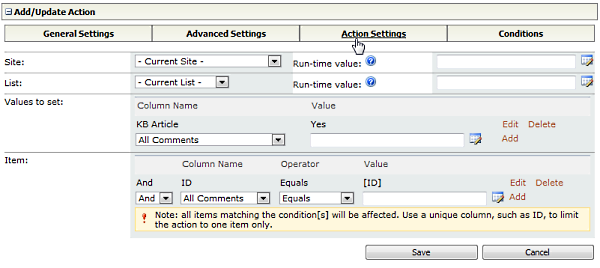
- Add the same condition as with the previous action.
This is it, your list now contains a new column named Create KB. Include this column in views. Clicking on it will generate a new page in the wiki library using the contents of the Comments column of your ticket.