
Introduction
In today's digital workspace, the aesthetics and functionality of forms play a pivotal role. Properly designed forms ensure in user engagement and data accuracy. Infowise Ultimate Forms empowers organizations to transform standard SharePoint forms into dynamic, visually appealing interfaces without the need for custom coding. This article delves into the advanced styling capabilities of the Forms component. It will guide you through the process of creating responsive, branded, and user-friendly forms.
Understanding the Importance of Form Styling
A well-designed form not only enhances the user experience but also streamlines data entry processes. By leveraging the advanced styling features of Infowise Ultimate Forms, organizations can:
-
Improve Usability: Clear layouts and intuitive designs reduce user errors.
-
Enhance Branding: Customized themes and styles align forms with corporate identity.
-
Ensure Responsiveness: Adaptive designs cater to various devices, from desktops to mobile phones.
Form Designer
Ultimate Forms' Form Designer is a fantastic tool for creating advanced, responsive modern forms in SharePoint. It works exactly the same both in SharePoint Online (Microsoft 365) and on premises. Although simple and intuitive at the first glance, it is actually loaded with features. It can help you implement advanced, multi-stage business solutions directly in your browser. You will need no programming and, in most cases, no complex workflows neither.
Form Designer is subdivided in the following main sections:
- Design canvas - the largest part in the center. This is where you drag your columns and other components and visually design your form.
- Left pane - here is your toolbox. All the columns in the list are there, waiting to be dragged onto the canvas. You will also see a selection of controls, such as buttons or tabs.
- Properties pane - this is where modify your column/component settings and add business logic rules.
- Breadcrumbs - located below the design canvas. It helps you to easily navigate the control hierarchy of the currently selected control.
Key Styling Features in Infowise Ultimate Forms
1. Themes
Infowise Ultimate Forms offers a selection of pre-defined themes. These themes allow you to quickly apply a cohesive look and feel to your forms. The themes control the general color scheme, fonts, and other stylistic elements, ensuring consistency across your SharePoint environment.

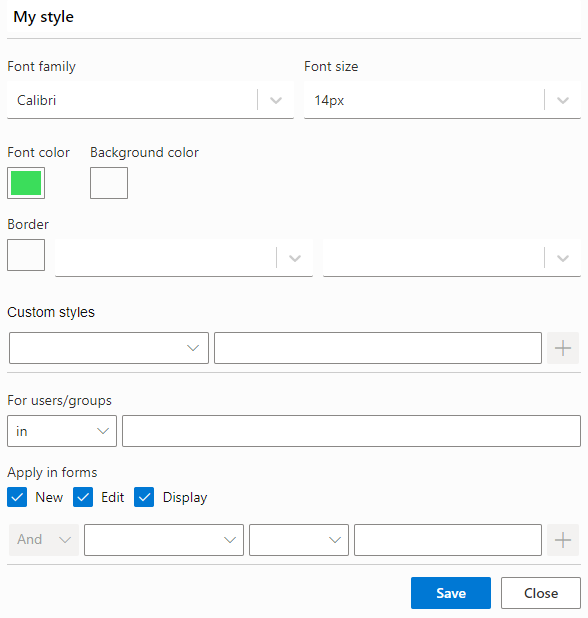
2. Style Rules
Style rules provide granular control over individual form elements. You can define specific styles - such as font size, color, background color, and borders - for any component. Moreover, these styles can be conditionally applied based on user roles, form states, or field values. This helps you configure dynamic and context-sensitive designs.
3. Containers
The Container control is a versatile tool for organizing form layouts. By grouping related fields and components, containers help create structured and readable forms. They also support responsive design by adjusting the layout based on screen size, ensuring optimal display on various devices.
You will notice there is no table control. If you used to work with other form designers in the past, you are probably used to having to build a table-based grid. Then you would place your columns, labels and buttons within the cells of that grid. That's the old way of doing things and it resulted in rigid forms. These were tightly tied to a specific device type (usually desktop) and looked horrible when viewed on a phone. In addition, this approach required long and meticulous adjustments of pixel-level dimensions. That was extremely wasteful of your time.
The Container control solve these issues by completely elevating the layout and responsiveness concerns. You can configure the container to display its child components vertically or lay them out side-by-side in 2 or more layout columns. Because containers are responsive by design, they will automatically adjust their content according to the device. So the same container will display:
- 3 columns side-by-side on a desktop
- 2 columns on a tablet
- 1 column on a phone
No need to mess around with device-specific forms, no need to adjust width or add device-specific CSS.
And because containers can hold other containers within them, it opens up unlimited design possibilities. For example, you have one container with 2 layout columns. You can then place another container with 2 layout columns within it. So now you divided the screen into 3 parts, half and two quarters! You can nest the containers as much and as deep as you need. Bear in mind that you can assign style and permission rules to anything on the form, including containers. So now you can create a fully dynamic form in minutes!
4. Tabs and Accordions
For forms with multiple sections or stages, Tabs and Accordions offer an effective way to segment content. These controls not only improve navigation but also support styling options, including themes and conditional visibility, enhancing the overall user experience.
5. Custom CSS
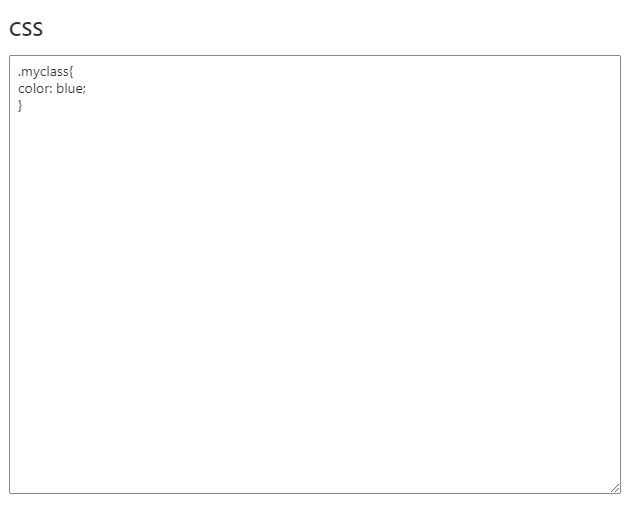
For advanced customization, Infowise Ultimate Forms allows the integration of custom CSS. You can assign your own CSS class names to form elements. This way you can apply specific styles defined in external or embedded style sheets. This provides unparalleled flexibility in form design.
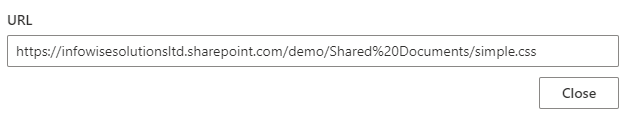
And here is how you reference an external CSS files:
Just to illustrate how an external CSS file would work like, this is my simple file's content:
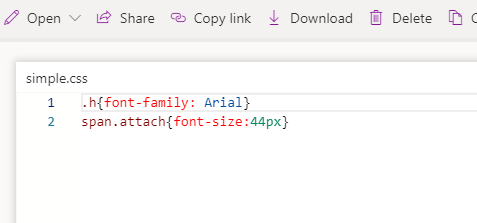
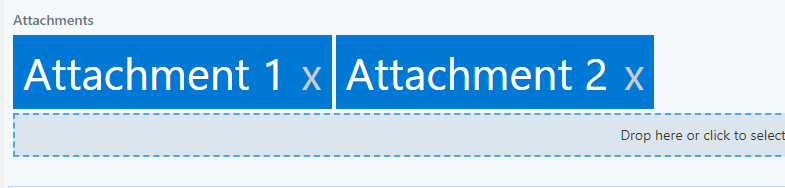
Once I add it to the form, it overrides the way file attachments look like. For instance, I wanted to display my attachments prominently:
Implementing Advanced Styling: A Step-by-Step Guide
Step 1: Access the Form Designer
Navigate to your SharePoint list or library. Next click on the "Design" button in the toolbar to launch the Infowise Ultimate Forms. Within it, click on Form Designer.
Step 2: Apply a Theme
In the Form Designer, select the "Styles" button on the main toolbar. Choose from the available themes to apply a consistent color scheme and font style to your form.
Step 3: Utilize Containers for Layout
Drag and drop the Container control onto the design canvas. Configure the container to display its child components vertically or in multiple columns, depending on your layout requirements. Remember, containers are responsive and will adjust their layout based on the device's screen size.
Step 4: Implement Tabs or Accordions
For multi-section forms, add Tabs or Accordions to organize content logically. Configure each tab or accordion section with appropriate labels and icons, and assign relevant columns to each section.
Step 5: Define Style Rules
Select individual form elements and access their properties pane. Under the "Style Rules" section, define conditions and corresponding styles to dynamically alter the appearance based on user input or other criteria.
Step 6: Integrate Custom CSS (Optional)
For advanced styling, assign CSS class names to form elements and define the corresponding styles in an external or embedded CSS file. This approach is particularly useful for applying complex styles or ensuring consistency across multiple forms.
Best Practices for Form Styling
-
Maintain Consistency: Use themes and style rules to ensure a uniform appearance across all forms.
-
Prioritize Responsiveness: Design forms that adapt seamlessly to various devices, enhancing accessibility and usability.
-
Leverage Conditional Styling: Apply styles based on user roles, form states, or field values to create dynamic and context-aware forms.
-
Test Across Devices: Regularly preview forms on different devices to ensure optimal display and functionality.
Conclusion
Advanced styling in Infowise Ultimate Forms empowers organizations to create SharePoint forms that are not only functional but also visually engaging and user-friendly. By leveraging themes, style rules, containers, and custom CSS, you can design forms that align with your corporate branding, enhance user experience, and improve data accuracy. Embrace these styling capabilities to transform your SharePoint forms into powerful tools that drive efficiency and user satisfaction.
For more detailed guidance and tutorials, visit the Infowise Ultimate Forms Documentation and explore our Training Resources.