Introduction
Relationships between entities are the basis of any information system. Your customers relate to your products and your projects relate to your tasks. Unfortunately, it is not always easy to set up and use relationships between lists in SharePoint. Especially when you try to implement more advanced types of relationships, such as many-to-many relationships.
But in reality, it can be quite easy, once you have the right tools. Associated Items column helps you do just that.
It can easily set up and navigate relationships between multiple different SharePoint lists. This will turn your SharePoint into a real application platform. You will be able to view and manage parent-child list relationships. This generates a SharePoint list hierarchy normally missing in the product.
You normally create relationships between lists in the same SharePoint site. You can also create them between two different sites in the same site collection.
Let's see how we do it
In this example, we will create a many-to-many relationship between our customers and products through support calls. Both customers and products can have many support calls. Using the Associated Items column makes it easy to create, view, and navigate support calls. You can do this directly from products or customers lists.
Associated Items column creates and maintains the relationship. First it automatically adds and maintains a unique identifier of the parent item within the child items.
When you open the parent item in a display or edit form, the column will scan the child list. The column will look for items corresponding to the unique ID of the parent item. The parent form will then display the child items in a tabular format.
In most cases, you will use simple one-to-many relationships. An example for that would be line items in an invoice or tasks associated with a project.
A many-to-many relationship expand upon that, by linking two items via a 3rd list of items. That is exactly what we are planning to demonstrate here today.
Creating SharePoint lists
We will need to set up 3 lists (each can be of any type, the types below are just what we used):
- Customers - a regular SharePoint contacts list
- Products - a regular SharePoint custom list
- Support Calls - a regular SharePoint custom list
In Support Calls add two lookup columns, one for products and another for customer, make both required. These lookup columns will establish the relationship between the lists. The Associated Items column will then display child items based on this relationship directly in forms and list views.
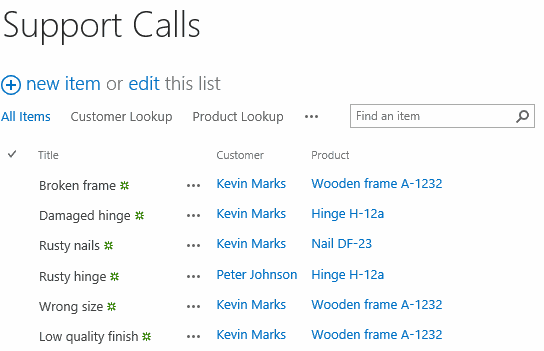
We also created two more views. One view called Customer Lookup includes Title and Product columns. The other is Product Lookup, which has Title and Customer columns. We will use these view for the Associated Items columns we are about to set up.
Associated Items columns will use the views we create here. They will control which columns show in the parent item. You can always modify the views to change the representation. You can also allow the column to display a list selector and allow the user to choose the view when interacting with the forms.
If your view contains filters and sorting, the column will respect them as well. When working with large lists, you can also enable paging. That will make your form load faster.
Creating associations
In Customers, add Associated Items column, pointing to Support Calls list. You only need to set up the view (Customer Lookup as explained above) and the option to add new items in the Display form. This way, we can add new support calls directly from the customer’s display form. You do not need to place the parent item in edit mode first.
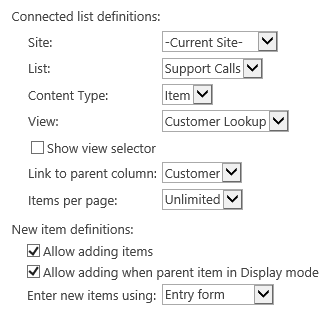
Do the same for Products list, but select Product Lookup view instead.
Seeing the results
At this point you have completed the setup. Open a product in the display form and add some support calls that point to specific customers.
You will see the product lookup field in the entry form. You do not need to select the product name again. The system will fill it in automatically, so there no need to handle it. You can also add support calls from the Customers list, in the same fashion.
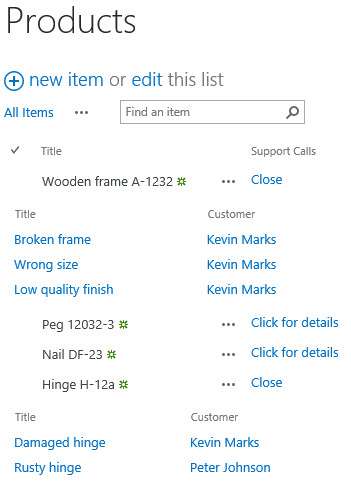
After you finish adding support calls, you can see them in both the Products and Customers lists. This provides you with a great way to explore the details. Note here both Wooden frame and Hinge products have their support calls sub-view expanded by user.