Hi,
A few days ago I was asked if it was possible to create a shopping cart mechanism in SharePoint using our product. Well, after some thinking I sat down and built it and I want to show you how something like that can be easily accomplished.
Our shopping cart is based on a blank site and offers the following functionality:
- Manage product categories, products and price lists
- Create shopping carts and add multiple products to them
- Automatically calculate tax and totals
- Print out the cart or create a PDF document.
We will need the following Infowise products
- Smart List Pro - will allow us to control permissions of certain columns, based on the shopping cart's lifecycle
- Associated Tasks Field - will allow us to create relationships between the cart and its content
- Connected Field - will allow us to create advanced lookup columns, with cascading functionality
- Smart Print Pro - will allow us to print the shopping cart content or convert it into PDF
- Smart ID Pro - will allow us to generate custom IDs (such as cart ID)
- Color Field - will allow us color-code cart based on status
Tip: All of the product (except Smart Print Pro) are part of the Ultimate Forms bundle and can be downloaded together.
I used SharePoint Foundation 4.0, but you can use WSS 3.0, MOSS 2007 or SharePoint Server 2010.
We will start with a blank site template and create the following lists:
- Product Categories (custom list) - contains the product categories, no changes are required to this list.
- Products (custom list) - contains the product names. Add a lookup field pointing to Product Categories. You can use the built-in lookup field or Connected Field. Connected Field will also allow you to add new categories on-the-fly while adding new products, which is very convenient. This column cannot be blank (required).
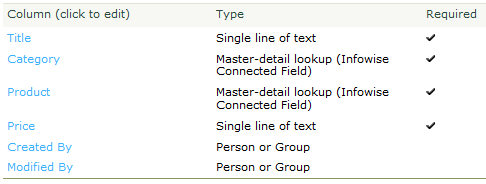
- Pricelist (custom list) - contains the product prices. Add the following columns to the list:
- Category - lookup to Product Categories. Can be a built-in lookup column or a Connected Field. Required.
- Product - Connected Field pointing to Products with Category being the parent column. Selecting a category filters the list of products. Required.
- Price - single line of text, required. In the simple scenario each product will have just one price, but you can also extend the site to have multiple prices (for example, temporary discounts). We will convert the column to Currency once we are done setting up all the lists, as we won't be able to use it in lookups unless it is a single line of text.
- Title - the Title column is already present, but we don't really need it. To make it uneditable, add an item ID pattern "[Category] - [Product]" for the column in Item ID Settings and select Prevent manual editing. That will fill the column in automatically with the selected product category and product name without the column having to appear on the data entry forms.
- Items (custom list) - contains the shopping cart line items. To enable relationship with the shopping carts, we need to replace the default content type "Item" with our custom content type "Associated Item". To do so:
- Go to List Settings
- Go to Advanced Settings
- Enable content type management (first option at the top) and save
- You should now see the content type listing, it should only contain Item.
- Click to add an existing content type and select Associated Item under Infowise. Save.
- Click on Item and delete this content type
- You can now disable content type management
- Add the following columns to the list
- Category - lookup to Product Categories list. Required
- Product - Connected Field pointing to Products with Category being the parent column. Required.
- Price - Connected Field pointing to Pricelists with Category being the parent column. Required.
- List Price - single line of text. We need to copy the price value from the lookup column into a currency column to be able to use the value in calculations. We will convert this column to be Currency once we are done setting up the list.
- Qty - number, required.
- Line Total - calculated column, [List Price] * [Qty]. We will format this column as currency.
- Create an item ID to fill in the List Price column using the Price column value. Select Prevent manual editing to hide the column from data entry forms.
- Shopping Carts (custom list) - contains the actual shopping carts. You should limit the user to only view their own items in the list settings. Add the following columns to the list:
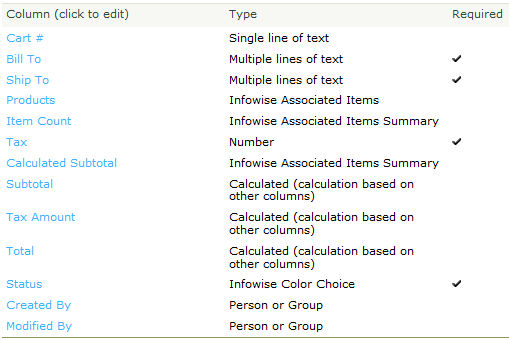
- Title (already exists) - create an item ID to fill in this column with an ID pattern of your liking. I used "SP-$Year([Created])-[#]", which will produce values such as "SP-2012-2", but you can do whatever you like. Prevent the column from being manually edited. Rename the column to "Cart #".
- Bill to - multiple lines of text. Billing address.
- Ship to - multiple lines of text. Shipping address.
- Products - Associated Items. The column will show the related items from Items list. You can leave the default settings intact.
- Calculated Subtotal - Associated Items Summary. Calculate the sum of Line Total values of the Products column
- Subtotal - calculated column using the value of Calculated Subtotal column and formatting it as Currency. This column is needed because Associated Items Summary column produces its result as number and we should show it as currency.
- Tax - number as percentage. Use the default value according to your local laws. You can also skip this column if tax is not applicable.
- Total - calculated column. Use the formula [Subtotal]+[Subtotal]*[Tax].
- Status - Color Choice field. Enter the shopping cart status values such as Open, Processing and Shipped. You can also use the regular choice field if you don't need to color-coding capability.
We are done creating all the lists. This would be a good time to convert some of the field from single line of text to Currency, as mentioned above.
We can also add tabs to Shopping Cart list to make the data entry easier. Also, you should set column permissions of the Status column to prevent data entry in New form (we will be using the default value there at this point, no user input is required).
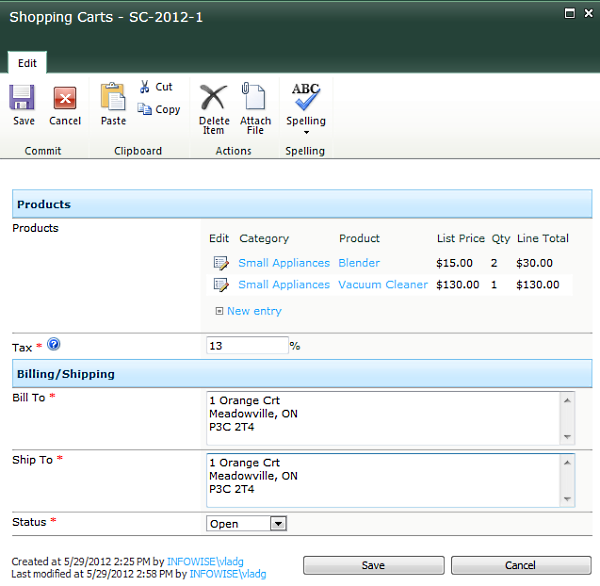
This is how our Shopping Carts list looks like:

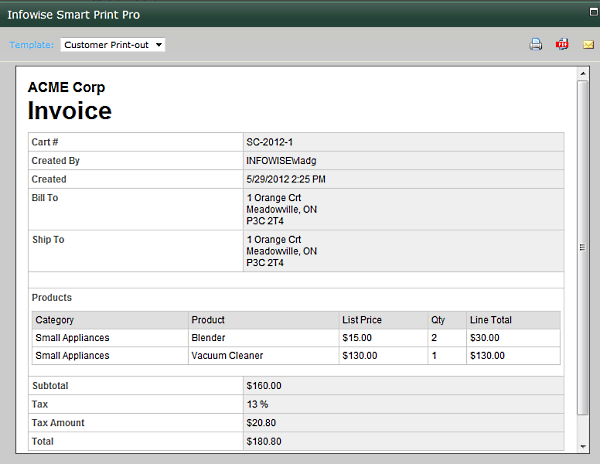
Also create a print template for the Shopping Cart list to make the print-out look respectable (add your logo, contact info and maybe some rules and conditions).
We are done. Fill in Product Categories, Products and Pricelist lists and your users can start shopping!
Add your comment
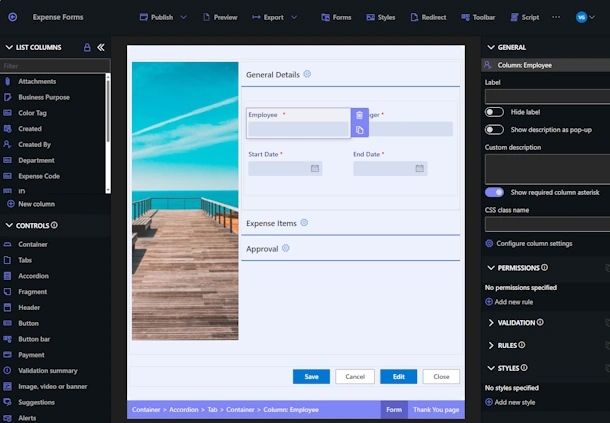
Flexible Forms
Convenient responsive modern forms, featuring tabs, section and column permissions, dynamic rules, repeating sections, electronic signatures and input validation, while keeping all your data safely inside SharePoint.
Smart dynamic SharePoint forms provide an exceptional user experience, improve data quality and simplify business processes, saving you valuable resources.
Intuitive Automation
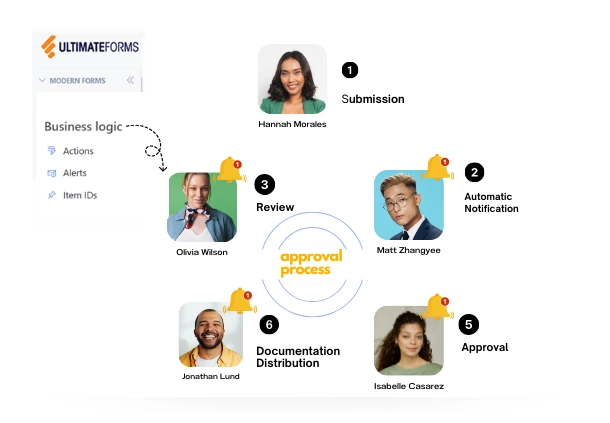
Replace complex SharePoint and Power Automate workflows with simple, but versatile Actions to create and update data inside SharePoint and in a variety of integrated applications, such as Exchange, MS SQL, Teams and many more.
By reducing the learning curve, you empower more people in your organization to create and manage business solutions, successfully removing bottlenecks.
Clear Reporting
Present data as actionable insights with detailed shareable reports, dashboards, KPIs, calendars and charts.
Everyone is able to visualize information in an accessible fashion, improving responsiveness and accountability.
100’s of Templates


