
Introduction
Date validation is a frequent requirement in business applications: you want to prevent users from entering invalid or illogical dates (e.g. a start date in the past, or a due date earlier than the start date). Traditionally, you might use cryptic validation expressions, custom JavaScript, or Power Apps to enforce these rules. But with Ultimate Forms, you can build and maintain date validations directly in the form designer, without custom code.
In this article, we’ll walk through how to configure date validation rules in Ultimate Forms, test them, and adopt best practices.
Why Date Validations Matter
Invalid dates can lead to:
-
Scheduling conflicts
-
Business logic errors (e.g. deadlines earlier than start)
-
Inaccurate reporting
-
Data integrity issues
By building validations at the form level, you ensure that only correct data is accepted, before it’s even saved.
Use Case Example: Tasks List with Start Date and Due Date
Let’s suppose you have a SharePoint list called “Ultimate Forms Tasks” with two date columns:
-
Start Date
-
Due Date
You want two validation rules:
-
Start Date cannot be earlier than today.
-
Start Date cannot be later than the Due Date.
We’ll use Ultimate Forms to enforce both of these.
Step 1: Open the Form Designer & Access Column Validations
-
In your SharePoint Online site, add the Ultimate Forms app if not already present.
-
Navigate to your list, then click Design to open the Ultimate Forms.
- Click on Form Designer. You will be taken to your existing form or a new form design will be automatically created.
-
In the designer's canvas, click on the date column you want to validate.
-
In the right-hand property pane, locate the Validation section and click to add a new rule.
Step 2: Create Your Validation Rules
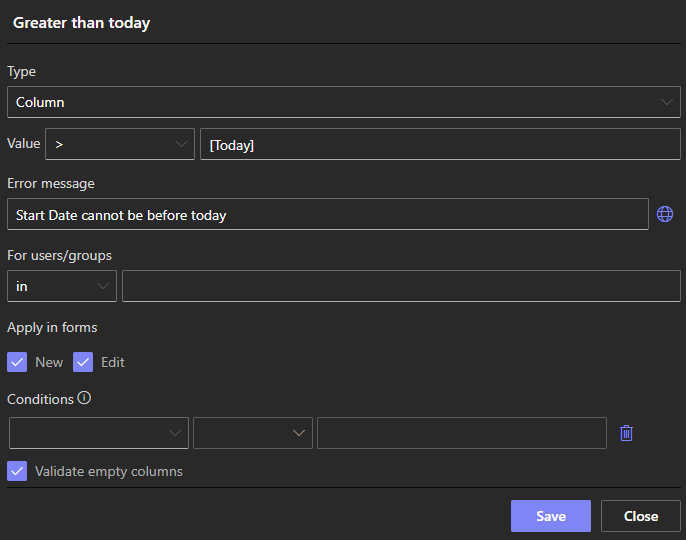
A. Prevent Start Date < Today
- Type: Column (validation against a fixed or dynamic value)
-
Operator: Greater than
-
Value:
[Today](the system token for the current date) -
Error Message: e.g. “Start Date cannot be before today”.
Use the Value Picker tool in Ultimate Forms to select [Today] or type in manually. Then click Add to create the rule.
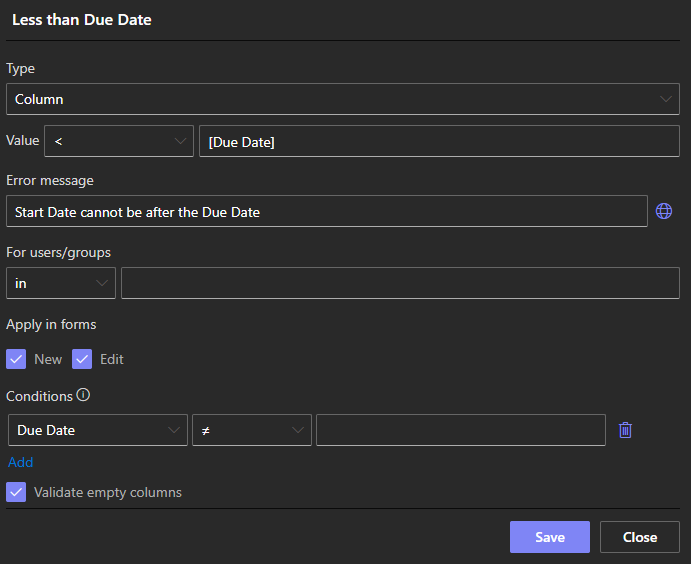
B. Prevent Start Date > Due Date
- Type: Column
-
Operator: Less than
-
Value:
[Due Date](referring to the Due Date column) -
Error Message: e.g. “Start Date cannot be after the Due Date”.
Again, use the Value Picker to choose the Due Date column, then add the rule.
Once both rules are added, publish your form.
Step 3: Test Your Validations in the List
Now let’s validate that your rules work as expected.
-
Test 1: Start Date before today
Try creating or editing an item and set Start Date to a date in the past. You should see your custom error message and be prevented from saving. -
Test 2: Start Date after Due Date
Choose Start Date to be later than Due Date. Again, the form should reject with your error message.
With your tests complete, the validation rules are now enforcing your business logic at entry time.
Benefits & Maintenance
✅ Advantages of Using Ultimate Forms
-
No custom code required — all validation is built via configuration
-
Centralized management — validation rules are easy to view, edit, or delete in one place
-
User-friendly error messaging — you control what the user sees when violations occur. You can also use the multilingual feature to present the same validation message in different languages based on the current user's preferred language.
-
Dynamic values supported — you can use tokens like
[Today]or reference other columns
⚠️ Considerations & Best Practices
-
Time component: If your date columns include time, review whether your validation logic accounts for time-of-day (e.g. midnight).
-
Missing or blank dates: Determine what behavior should occur if Due Date (or referenced column) is blank. You may need default values or fallback logic.
-
Multiple rules interaction: Ensure rules do not contradict each other or produce confusing messages.
-
Performance: In very busy forms or large lists, test to make sure validation does not introduce lag.
Expanded Examples & Variations
Here are a few more scenarios you might implement:
-
Start Date must be after a different milestone date — use validation against another date column (e.g.
[Milestone Date]). -
Due Date must not exceed a maximum threshold — e.g.
Due Date ≤ [Start Date] + 90 days. There are many functions you can integrated using the Value Picker. -
No overlapping periods — validate that a new period does not overlap with existing ones using combined column and list-level validation.
-
Conditional validation — e.g. only enforce the rule if a Status column = “Approved” or some flag is set.
Summary
With Ultimate Forms in SharePoint, you can build date validations elegantly and maintainably, right in the Form Designer. No custom scripting or external workflows needed. By creating rules such as “Start Date ≥ Today” or “Start Date ≤ Due Date,” you enhance data integrity, prevent entry errors, and simplify future maintenance.