
Is it easy to build a Customer Onboarding (Account Creation) Solution for a Bank using Infowise Ultimate forms?
Dear Readers, I have been using Infowise Ultimate Forms for about a month and a half. The fact that I absolutely love about the product is how convenient it is to have all the features in one place. I am able open my Infowise Ultimate Forms app right from my SharePoint list. Then I can use it to create forms and processes easily and quickly.
Life without Infowise Ultimate Forms
If I didn't have Infowise Ultimate Forms, I would need Power Apps or SharePoint Designer. These tools would help me create and update my form design. I could also add the company logo and branding.
Sometimes it would also be necessary to add bits and pieces to make responsive web pages. By responsive webpage, I mean an application that works well with all kinds of devices.
We also need SharePoint Designer workflows or Power Automate to ensure the processes run smoothly. If we need approval, we must add items and create the structure.
Let's discuss the possible scenarios using an example, say Customer Onboarding in a bank.
Customer Onboarding: How does an account creation work in a bank?
The process of customer onboarding begins with the request to open an account. Say an individual wants to open a bank account.
He or she will then proceed to either call or visit the branch of their convenience. Next, he or she fills out the onboarding form and submits it to the bank. The customer also needs to provide a set of documents, commonly known as KYC or Know Your Customer documents.
Once the bank receives all the documents, a team will review them. This team consists of Legal and Compliance officers. They will check the information provided by the customer.
If they find all the information current, the bank creates a new account for the customer.
This is the first step when a bank introduces a customer to its banking service. Streamlining this process is crucial. If the customer is happy with the service, it will ensure their loyalty. Moreover he or she might also recommend other people, thereby increasing the bank profits.
However, this is quite a lengthy process. It has multiple levels of checks and approvals by Legal and Compliance teams for the information provided.

Customer Onboarding: Forms and Process
To create a customer onboarding process, it is important to create a suitable form. This form should include all the information about the customer. Traditionally it consists of a large number of fields and options. We store all the information here, such as the account type, branch details, and nominee information.
To create a large form, like the customer onboarding form, it is important to make it interactive.
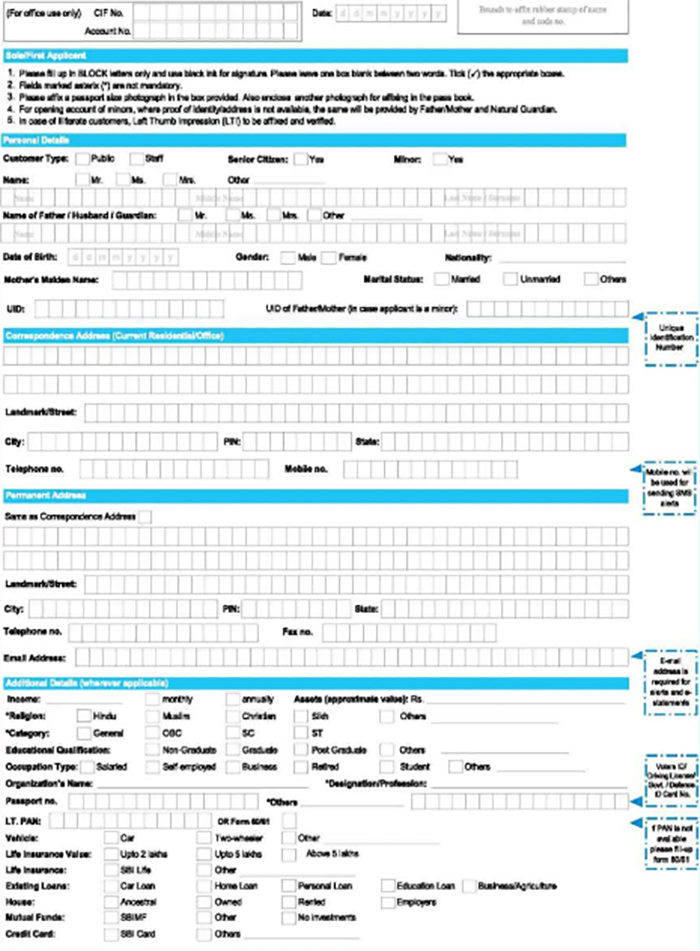
My requirements for the form include:
- It must have the proper bank color branding and logo.
- The form has to consists of distinct blocks of information, using accordions and tabs. This will help us to segregate the information.
- The fields need to update on the selection of a given field. For example, if my account type is Joint Account, I need to provide the name of another account holder. If it is a Personal Account, then I will not need another account holder.
- Form type defines which fields the form presents. As in the case of Account Number, New Item should not show account number, but Edit form needs to have an account number fields.
- Once someone creates the form, the approval process starts.
Customer Onboarding: Creating a solution using SharePoint, Power Apps and Power Automate
When you make a list of items in SharePoint, it automatically creates three forms: New, Edit, and View. The forms are responsive, but they are not easy to customize. For example, hiding or showing options based on item selection is tricky. Hiding fields depending on the action, like New Item or Edit Item, is also difficult.
A solution for that could potential be to use Power Apps. However, with Power Apps, we can either change only the form design or create a mobile/iPad based app. Though I can code the app to hide and show fields, based on conditions, a certain amount of coding skills is necessary.
Also, there is no simple drag-and-drop option available to create tabs and accordions. You cannot easily customize the CSS to change the look and feel.
Once I've created the forms using Power Apps, I need to use Power Automate to update the approval process. However, this also includes a learning curve and might not be a quick drag and drop solution.
This, in turn, means that I have to move between applications to create a perfect solution.

Customer Onboarding: Creating a process using SharePoint and Infowise Ultimate Forms
Infowise Ultimate Forms, on the other hand, solves my problem quickly. I can add CSS and quickly create a custom design and branding.
You can even easily accomplish the conditional show and hide of the account number field using the checkboxes. I can add rules and permissions easily, even in each field. I can add custom style to my fields and not just forms and even custom notification.
You can also easily set Custom Validations and Rules on the click of a button. Best of all, you are able to accomplish all your tasks either using drag and drop or clicks. This is something that an ordinary user can easily perform with minimal training. The Form Designer also has good documentation, available just by clicking the help icon on the top right corner.
Infowise Ultimate Forms includes a detailed section on Business Logic. Here, you can easily create alert and approval processes with just a click.
I can easily create my entire solution in SharePoint, without moving around to any other application. Thus it is simple, easy to use and convenient, even for a non-technical user.
I had fun mapping out my process using Infowise Ultimate Forms. What solutions are you guys working on? I would love to learn more about your challenges.
Join me next week as I share more about the data and charts-based application.