
What is Ultimate Forms?
Ultimate Forms is a no-code/low-code solution designed to enhance SharePoint's capabilities by allowing users to create dynamic business processes, forms, and workflows without requiring programming knowledge. It provides a comprehensive set of tools, including custom forms, automation, notifications, permissions control, and integration with external data sources. Organizations use Ultimate Forms to streamline operations such as document approvals, HR processes, project tracking, and purchase requests, making SharePoint more powerful and user-friendly.
One of the key features of Ultimate Forms is its approval workflows, which can be configured for static or dynamic approvals depending on business requirements.
Introduction to Dynamic Approvals:
Ultimate Forms supports two types of approval processes: static approvals and dynamic approvals.
• Static approvals involve predefined approvers at each stage. A good example for that is our Vehicle Reservation System which has three stages – User Request, Manager Approval and Vehicle Supervisor. Although the user could be anyone, the Manager and the Vehicle Supervisor are strict and do not change according to the user who places the request.
• Dynamic approvers adapt based on conditions. Good example for that is our HR Recruitment Process System which has five stages, each stage can have a different approver according to the association of the candidate. For example, if the HR recruiter associated the candidate to the Customer Service department then the approver should be the customer service manager, but if the HR recruiter associated the candidate to a different department, than the approver should be the person who runs that department and so on.
Using dynamic approvals ensures that the right person always reviews and approves requests based on real-time business logic, reducing delays and miscommunication. This guide demonstrates how to configure dynamic approvals in a Purchase Request System using Ultimate Forms.
Setting Up Lists and Columns:
The system requires three SharePoint lists:
- Purchase Requests – Stores user-submitted requests and approvals.
- Approval Tasks – Holds approval tasks for each request.
- Departments – Maps each department to its designated approvers.
Step 1: Create Required Lists:
- Follow the original setup guide to establish the Purchase Requests list.
- Create the Departments list from a custom list template.
Step 2: Configure the Departments List:
- Rename the Title column to Department Name.
- Add a new column:
-
- Name: Purchase Request Approvers
- Type: Person or Group (allow multiple selections if needed).
3. Populate the list with department names and their corresponding approvers.
This configuration ensures that every department has a designated approver(s), allowing for automatic routing of requests.
Step 3: Link Departments to Purchase Requests:
- In the Purchase Requests list:
-
- Add a Lookup column named Department, linking to the Department Name column in the Departments list.
- Set the column as required.
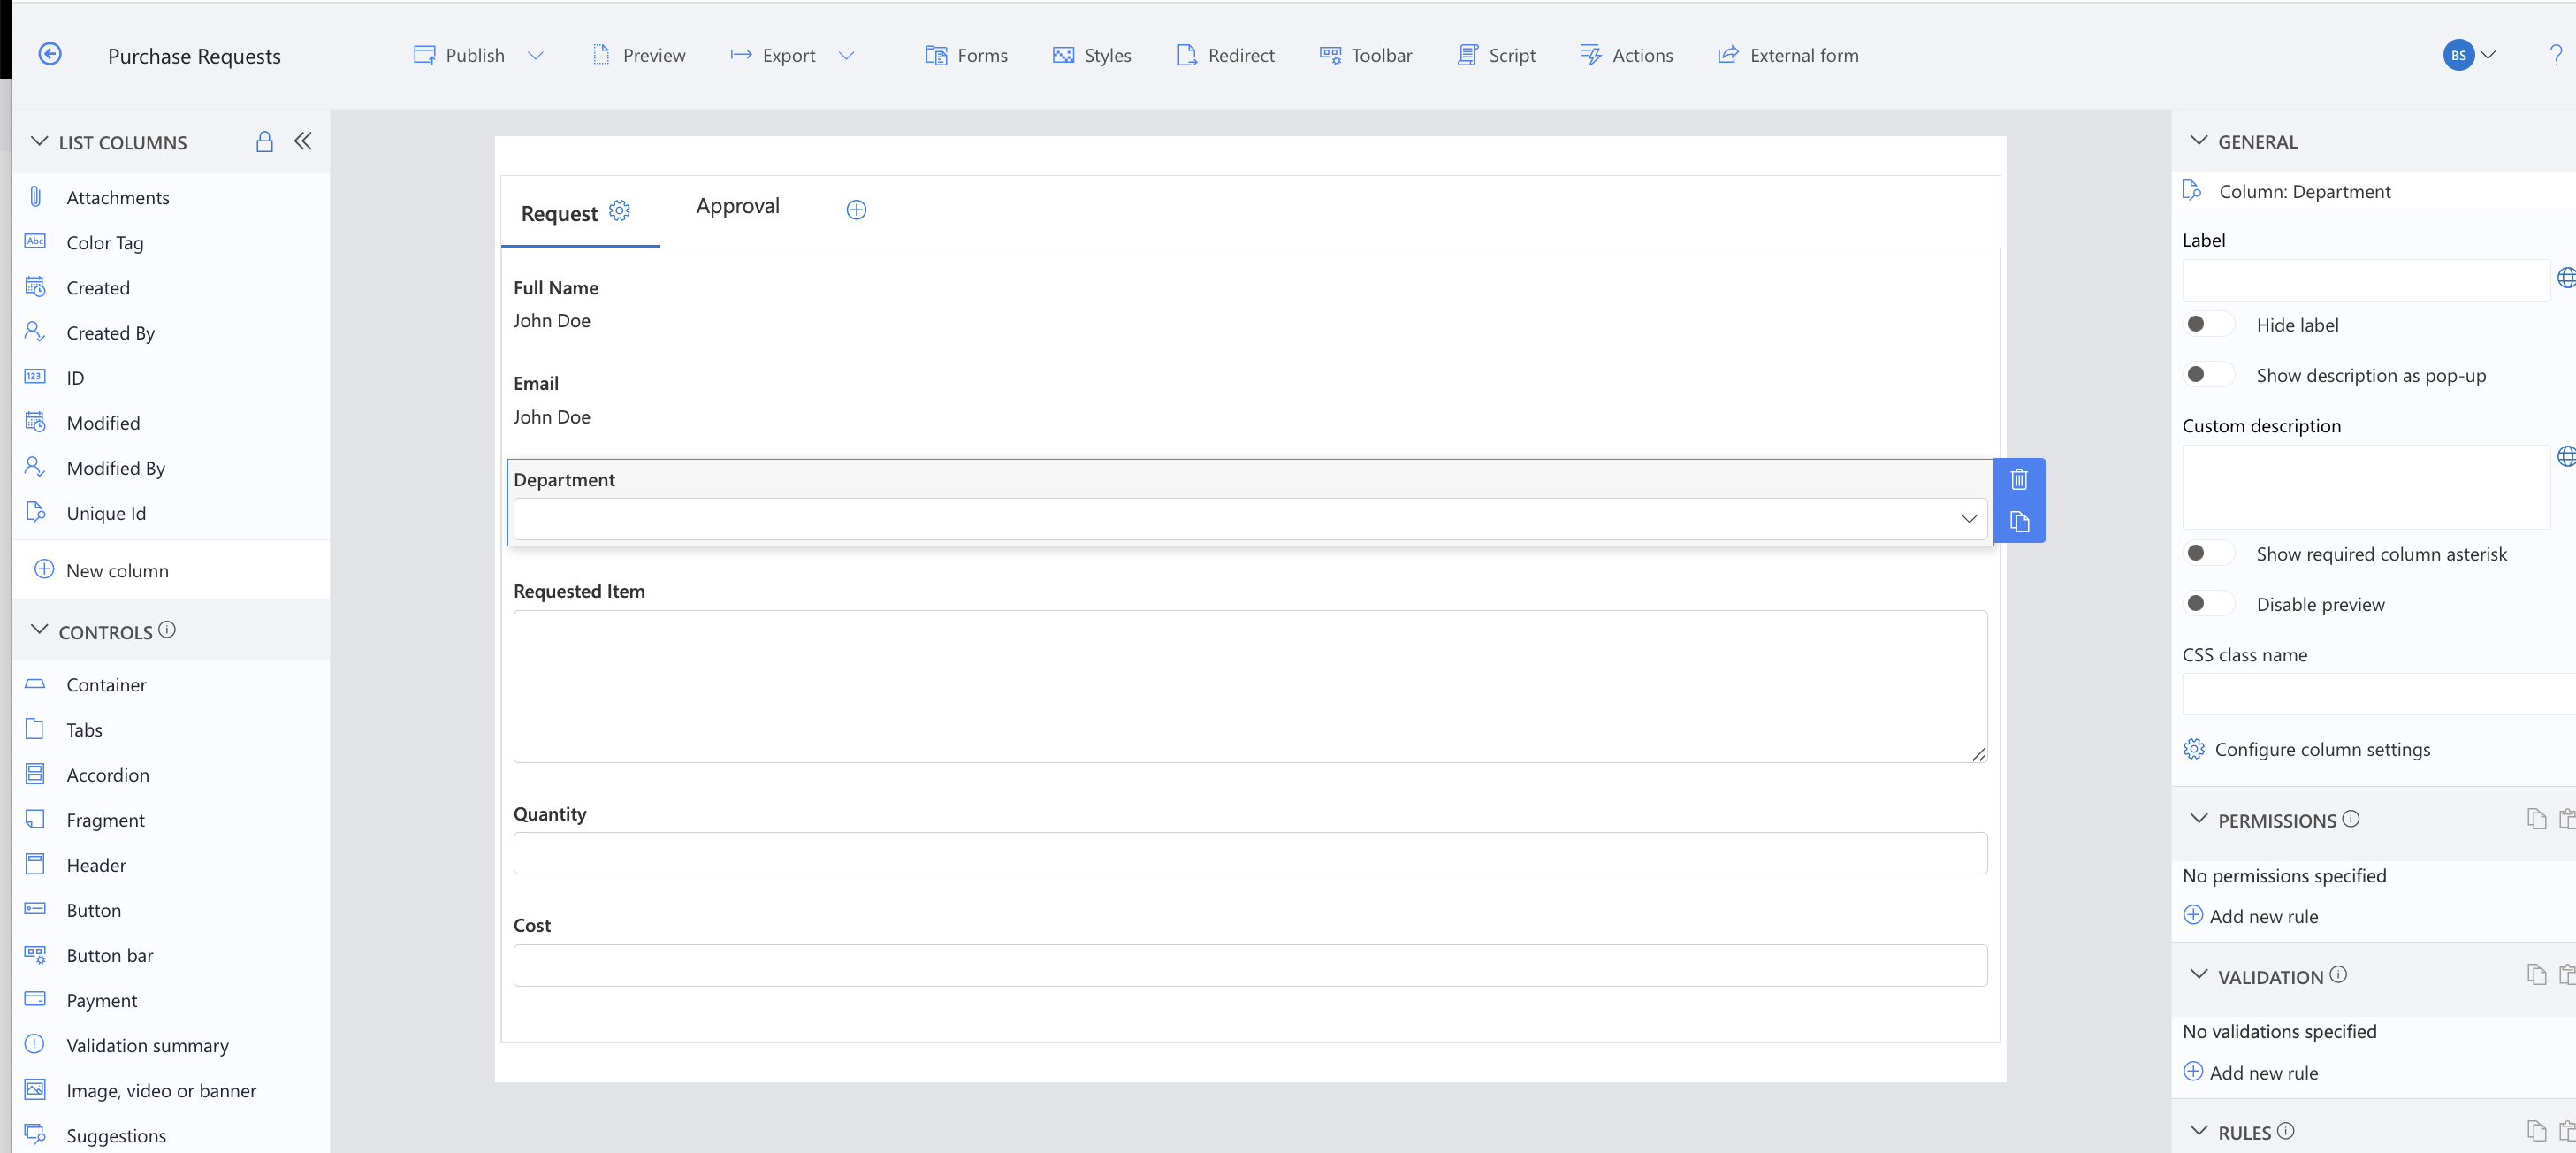
2. Open Tabs and Tab Permissions in Form Designer.
3. Modify the Request Tab:
-
- Add the Department column.
- Set column order to 3.
- Click Save -> Publish.
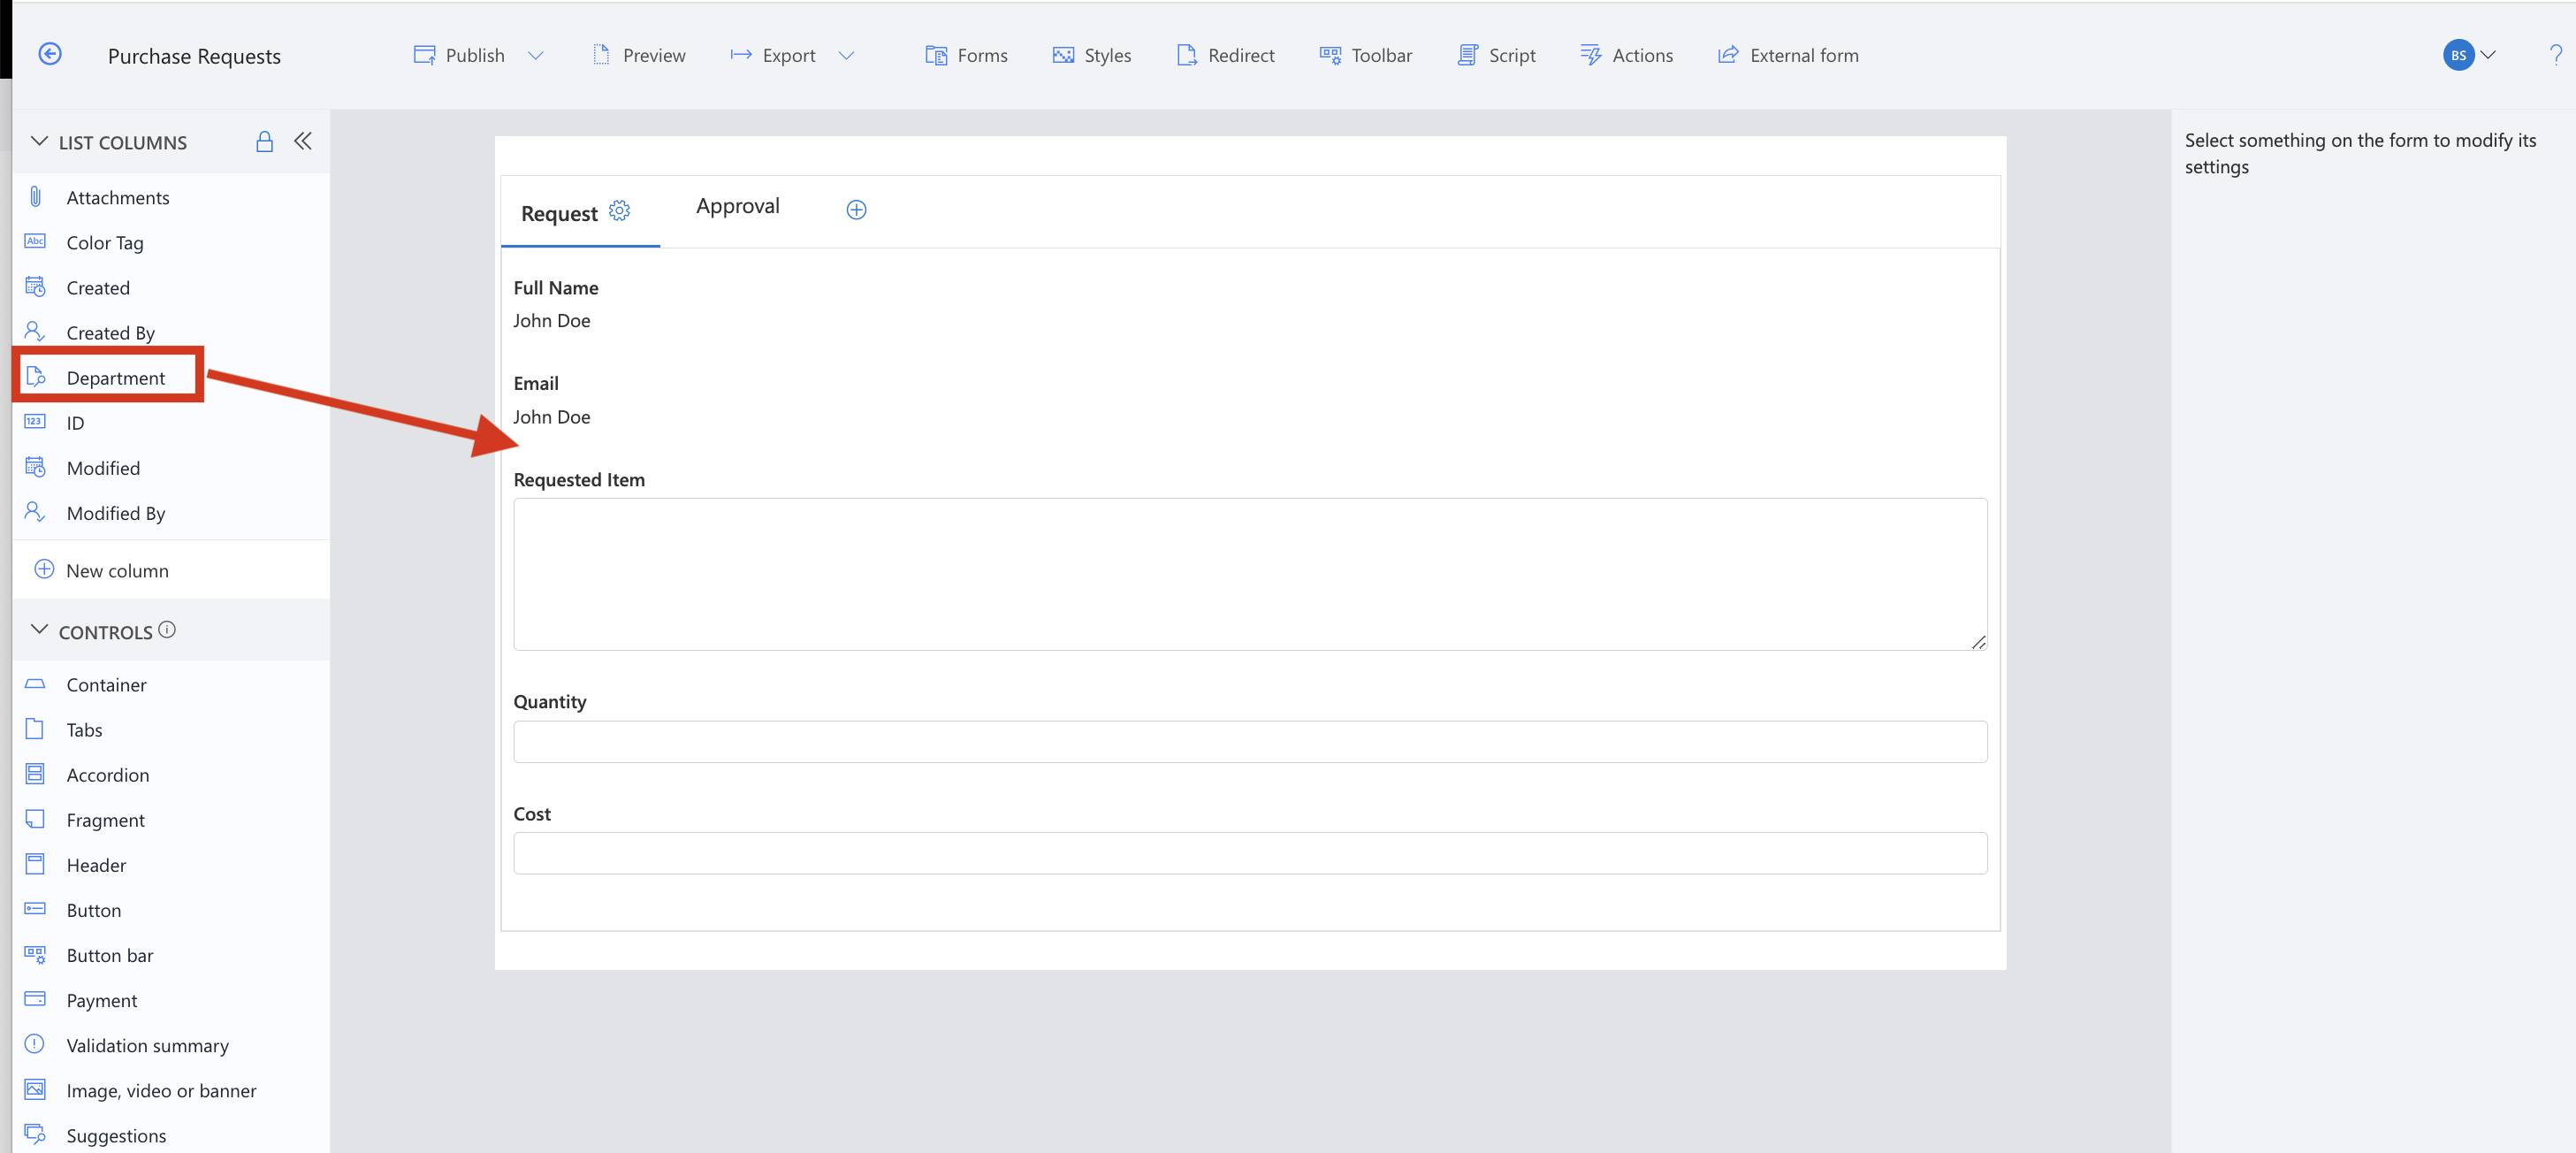
This step ensures that when users submit a request, they must select a department, which determines the approver dynamically.
Configuring Approval Permissions:
- In the Purchase Requests list:
-
- Navigate to Tabs and Tab Permissions in form designer.
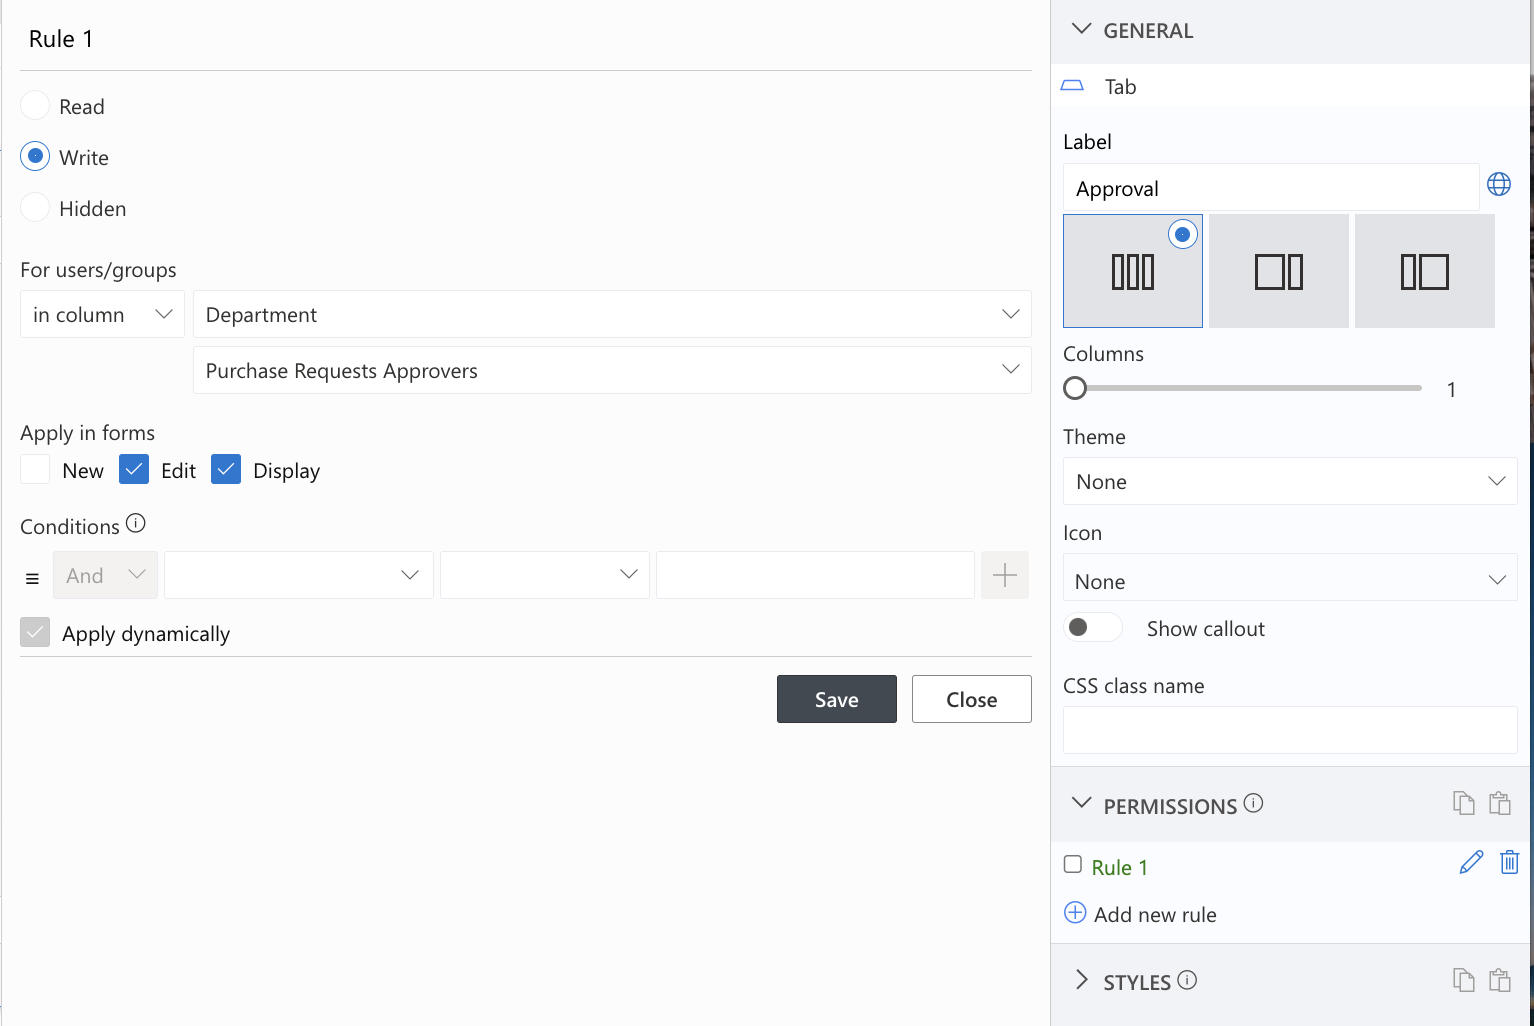
- Select the Approval tab.
2. Add the Write rule in Permission Rules:
-
- Set For users/groups: in Column.
- In the dropdown, select Department.
- On the Dropdown underneath, choose Purchase Request Approvers.
- Click edit and display on the Apply in forms
3. Click Save.
Now, only the assigned approver(s) can edit and approve the purchase request, ensuring the correct approval workflow.
Automating Approval Notifications:
- Navigate to Actions Settings in the Purchase Requests list.
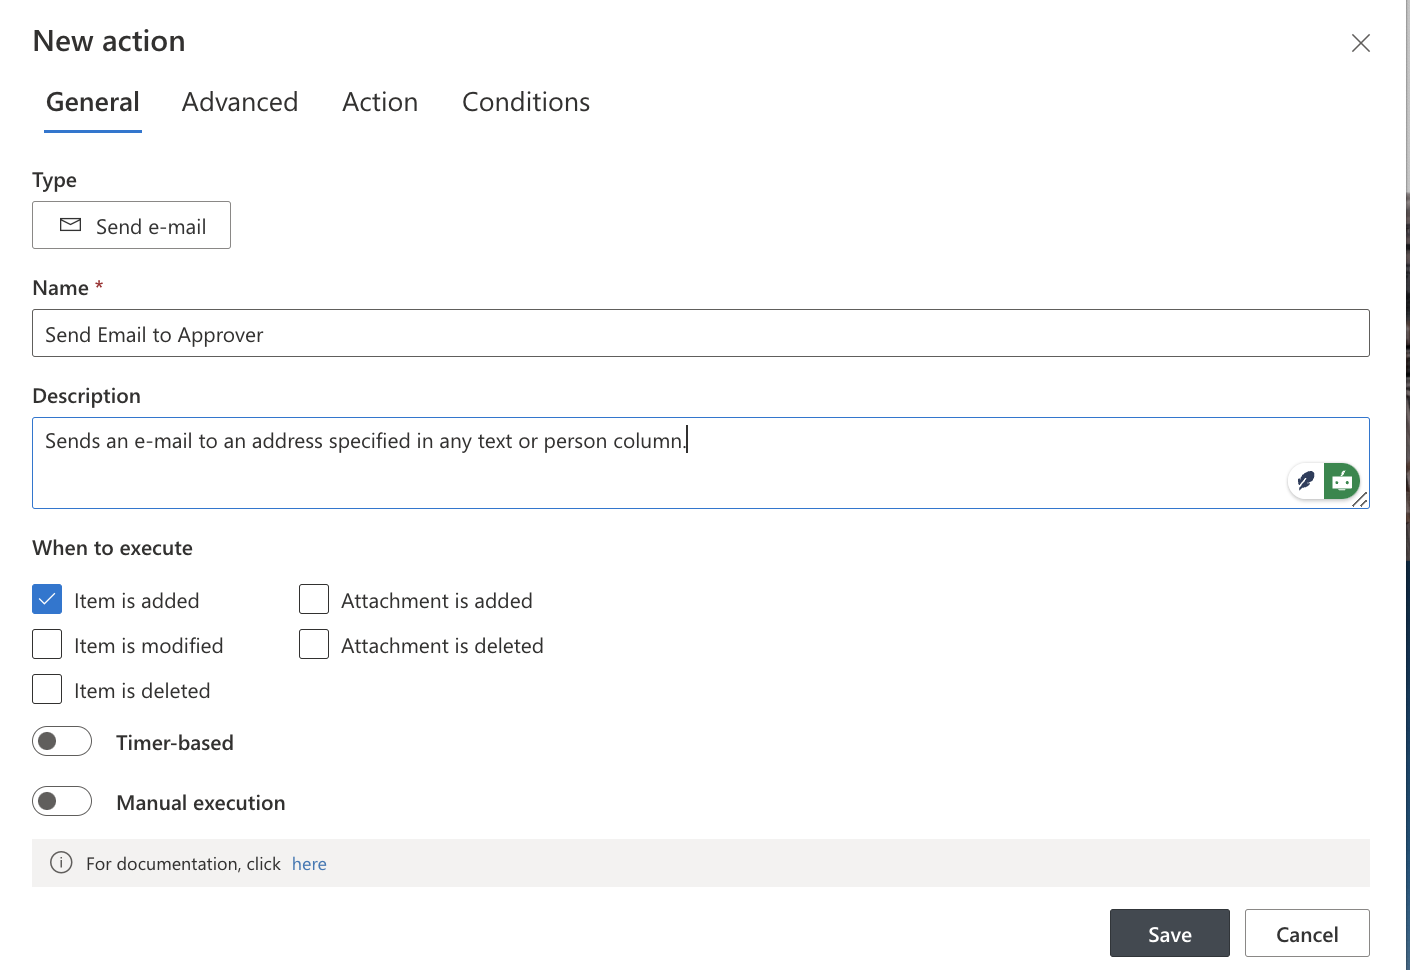
- Create a new action:
-
- Type: Send Email
- Name: Send Email to Approver
- Uncheck the item modified checkbox.
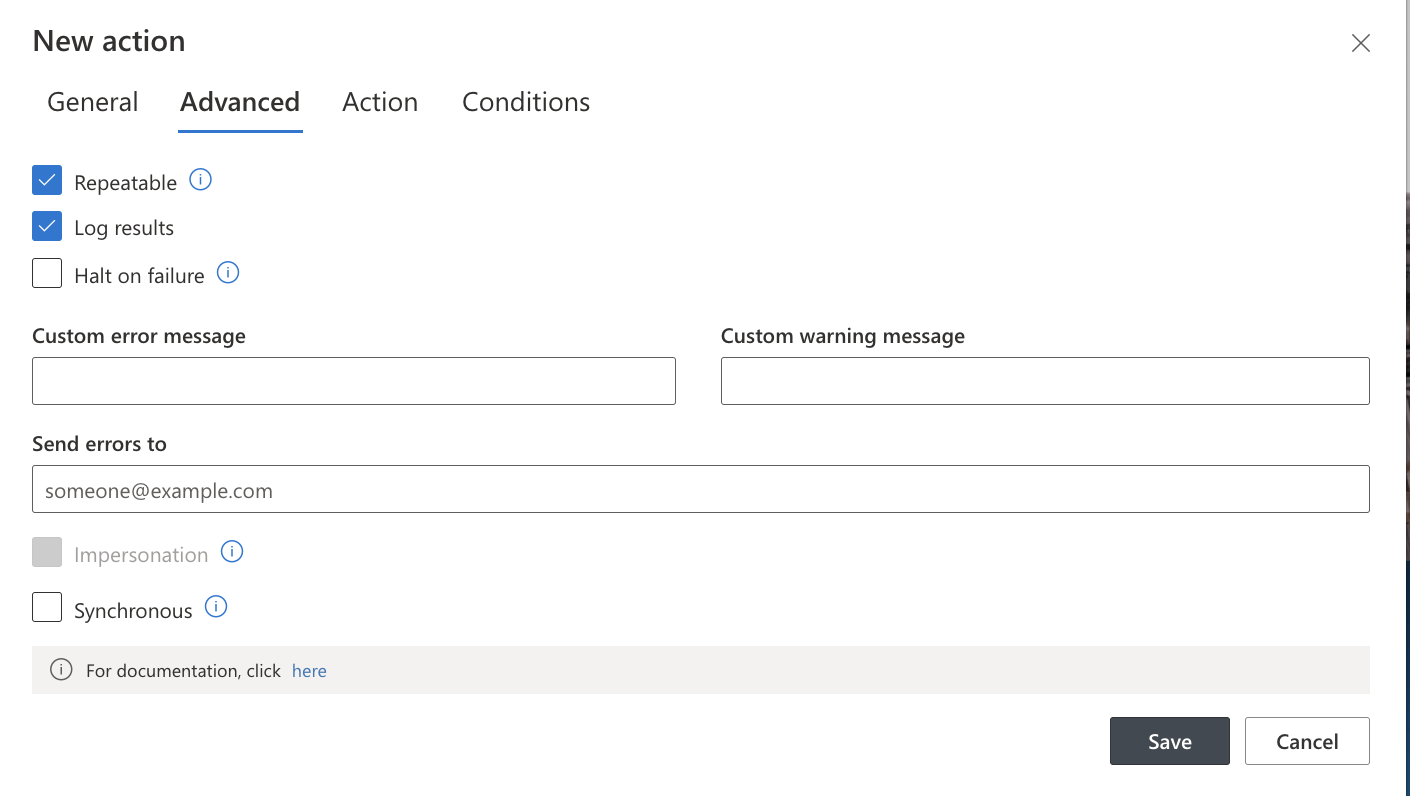
3. Open the Advanced Settings tab:
-
- Check "repeatable" and "log results"
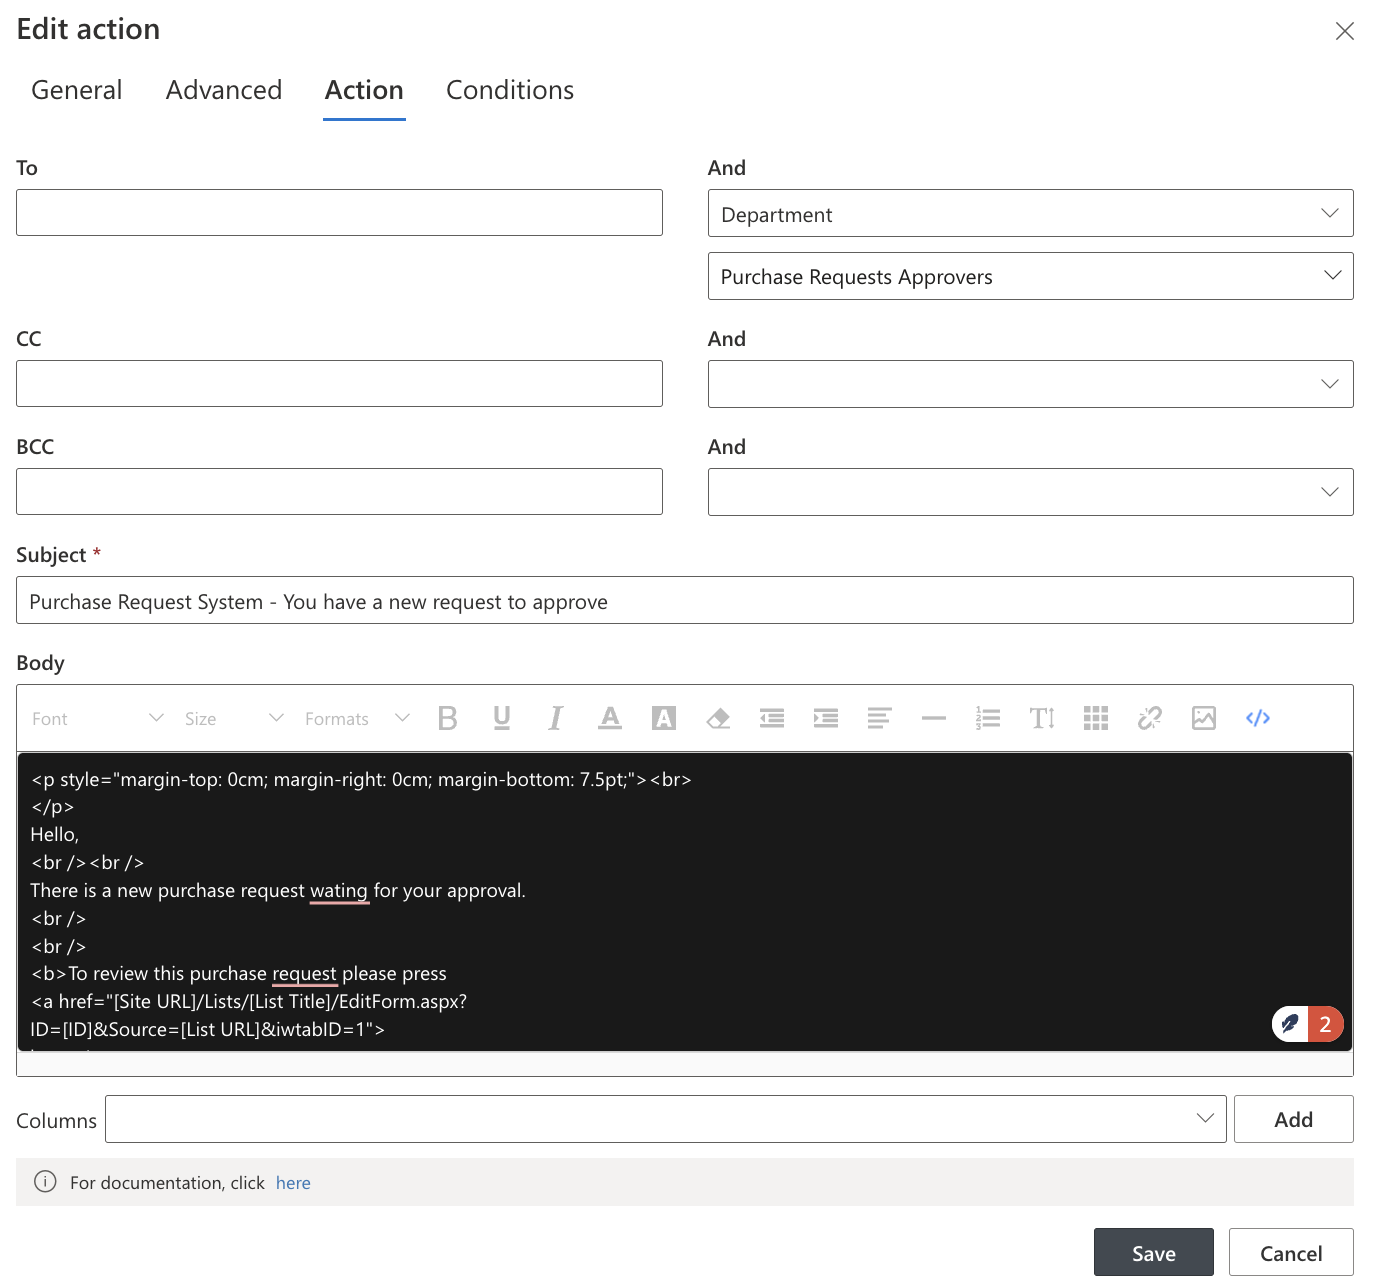
4. Open the Action Setting tab:
-
- On the To: field click on the right dropdown (and not the left people picker) and choose Department.
- On the dropdown underneath, choose Purchase Request Approvers.
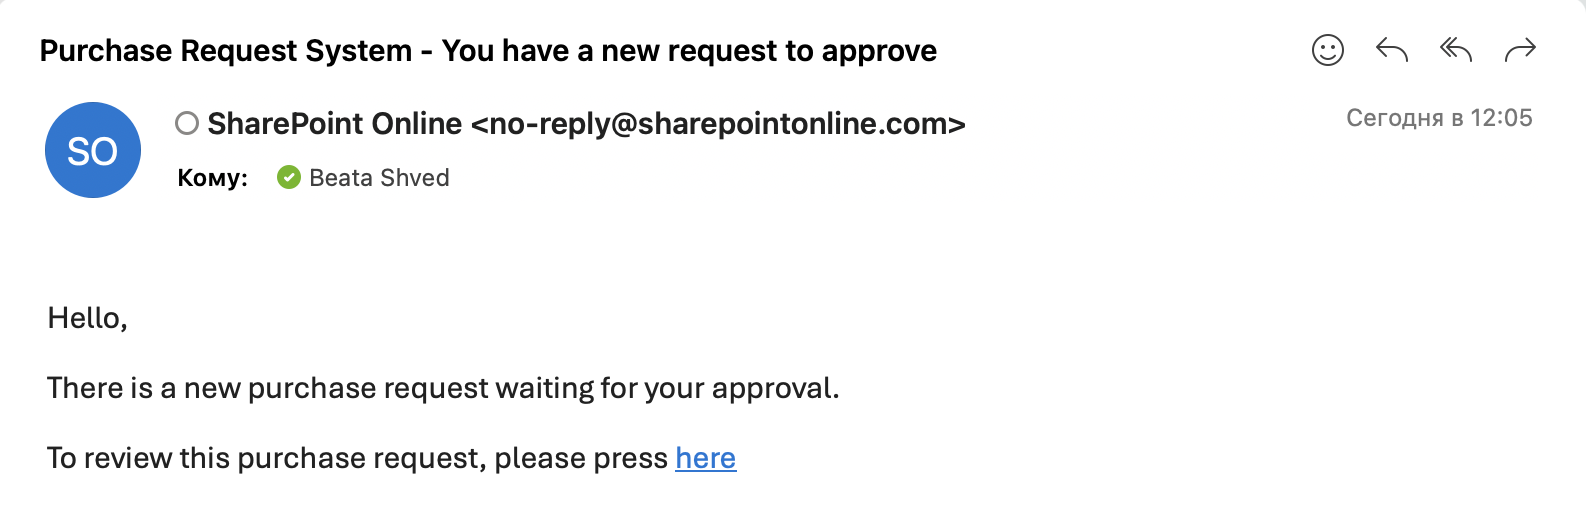
- Subject: "Purchase Request System - You have a new request to approve."
- Body: add the following HTML text:
<div style="font-size:12px;font-family:Arial;" >
Hello,
<br /><br />
There is a new purchase request wating for your approval.
<br />
<br />
<b>To review this purchase request please press
<a href="[Site URL]/Lists/[List Title]/EditForm.aspx?ID=[ID]&Source=[List
URL]&iwtabID=1">
here</a>
</b>
</div>
5. Navigate to the Conditions tab.
- Add two conditions using the AND operator:
- Requested Item → Not Equals → Leave Empty
- Department → Not Equals → Leave Empty
- Click Save
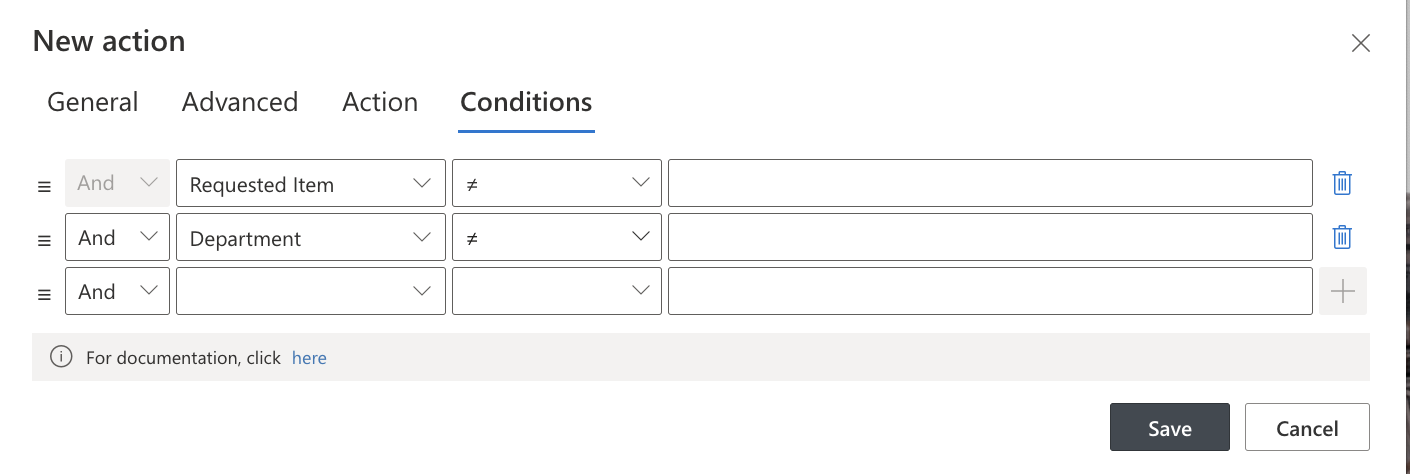
These conditions ensure that notifications are only sent when a request is valid and a department has been assigned.
Now the system should be up and running.
Testing the Dynamic Approval System:
- Log-in as a Requester user and submit a new Purchase Request.
- Create a new request by adding a new item to the Purchase Requests list.
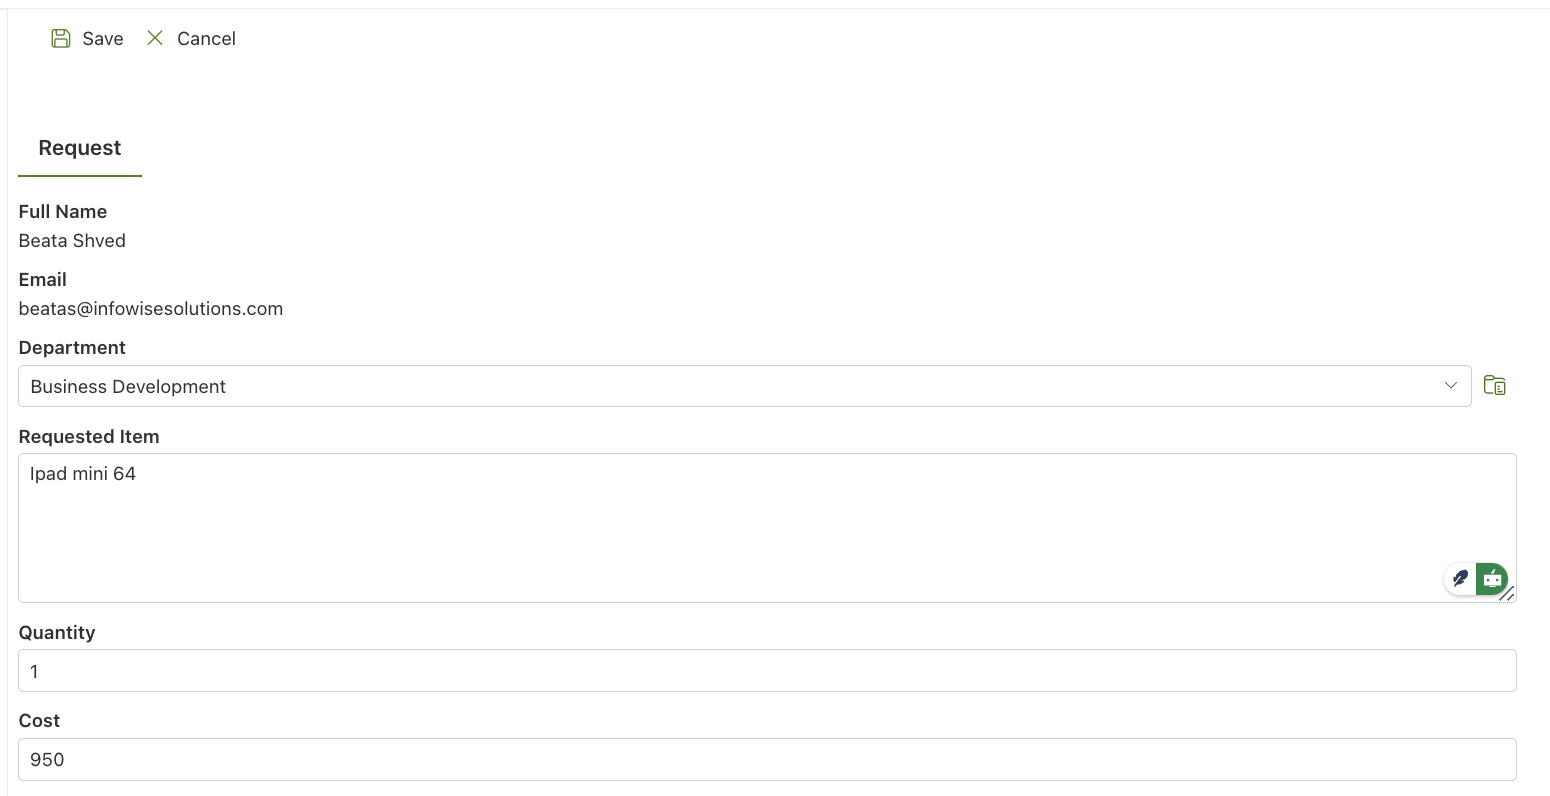
- Fill out all the columns and click save
- Check the Approver's Email:
- The designated approver for the assigned department will receive a notification with a direct lin
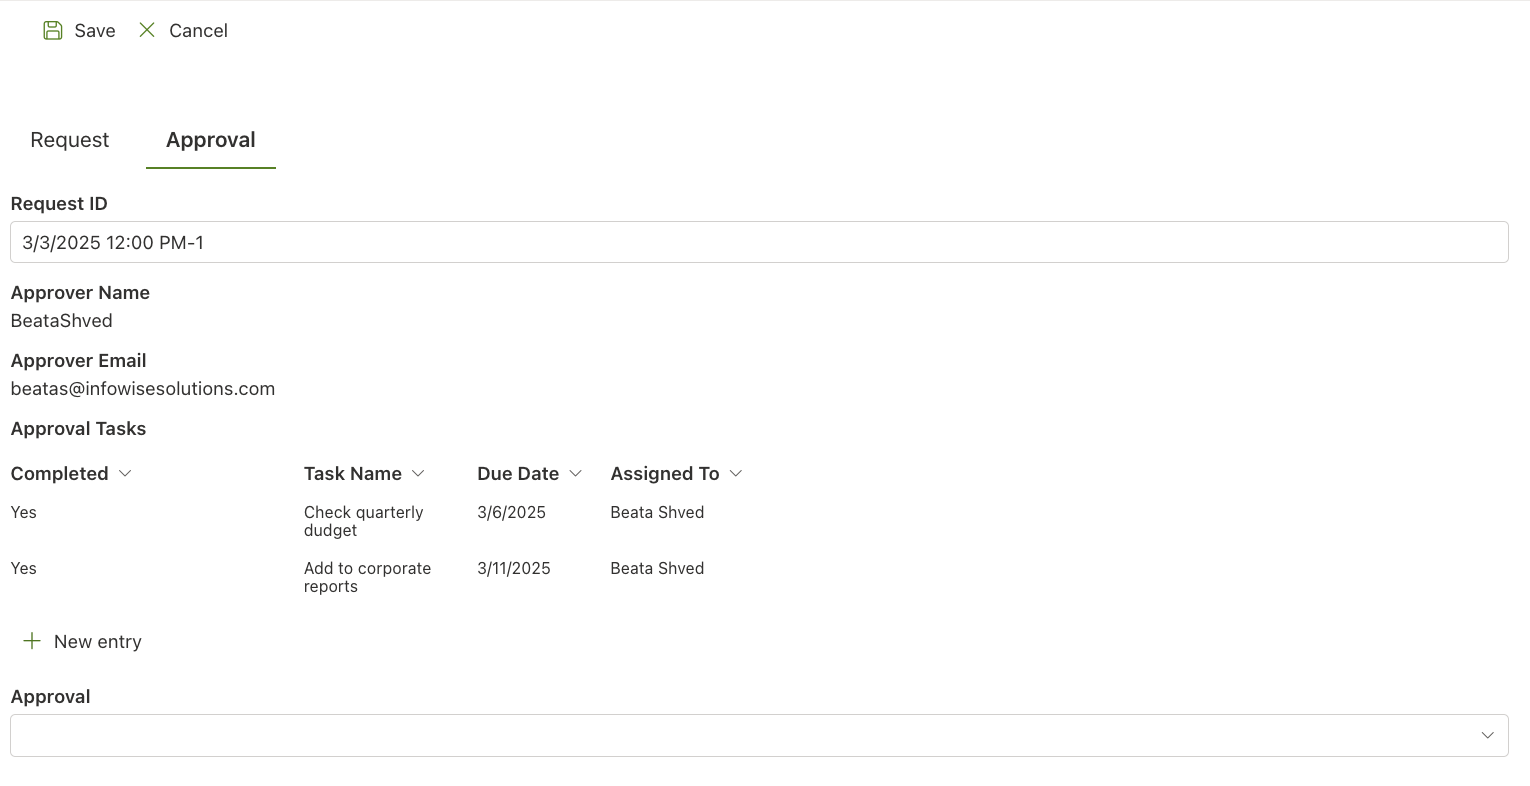
5. Approver Actions:
- Click the link to review the request.
- Navigate to the Approval tab.
- Approve or reject the request.
Don’t remember to log-in with the approver credentials first.
The system now supports dynamic approvers, ensuring that requests automatically reach the correct decision-makers.
Additional Benefits of Dynamic Approvals:
Scalability – As departments change or grow, approvals remain flexible without requiring workflow modifications.
Time-Saving – Automating approver assignments reduces manual interventions.
Better Compliance – Ensures proper authorization and tracking for every request.• Improved User Experience – Requesters and approvers receive clear guidance on actions required.
Conclusion:
With Ultimate Forms, it is easy to create flexible, dynamic approval processes within SharePoint. This Purchase Request System showcases how approvals can adjust dynamically based on selections, eliminating static workflows.
By leveraging features like Tabs and Permissions, Actions, Connected Lookup and Associated Items, organizations can streamline approval processes effortlessly.
For more details, explore the Ultimate Forms Documentation and start building your own dynamic approval workflows today!